<?xml version="1.0" encoding="utf-8"?><feed xmlns="http://www.w3.org/2005/Atom" ><generator uri="https://jekyllrb.com/" version="3.10.0">Jekyll</generator><link href="https://damianvillarreal.com/feed.xml" rel="self" type="application/atom+xml" /><link href="https://damianvillarreal.com/" rel="alternate" type="text/html" /><updated>2026-11-05T22:12:28+00:00</updated><id>https://damianvillarreal.com/feed.xml</id><title type="html">dsuyu</title><subtitle>Notes on software, security, and systems from Damian Villarreal — a computer science student writing about what he builds and breaks.</subtitle><author><name>Damian Villarreal</name></author><entry><title type="html">Using Splunk’s Attack Range for Research</title><link href="https://damianvillarreal.com/blog/2026/08/04/standing-up-splunk-attack-range-the-traps-nobody-warns-you-about/" rel="alternate" type="text/html" title="Using Splunk’s Attack Range for Research" /><published>2026-08-04T15:00:00+00:00</published><updated>2026-08-04T15:00:00+00:00</updated><id>https://damianvillarreal.com/blog/2026/08/04/standing-up-splunk-attack-range-the-traps-nobody-warns-you-about</id><content type="html" xml:base="https://damianvillarreal.com/blog/2026/08/04/standing-up-splunk-attack-range-the-traps-nobody-warns-you-about/"><![CDATA[<h2 id="why-i-was-doing-this-at-all">Why I was doing this at all</h2>

<p>I’m building a research project this summer that needs security <em>logs</em>, which are the raw machine exhaust that a Security Operations Center actually stares at. Endpoint process trees from Sysmon, Windows security events, cloud audit trails. The catch is that I need two kinds: <strong>malicious</strong> logs (an attack is happening) and <strong>benign</strong> logs (a normal, boring Tuesday). The malicious side is easy — Splunk publishes a big public dataset of attack captures. The benign side is where it gets interesting, and it’s why I ended up spending an afternoon fighting <strong>Splunk Attack Range</strong>.</p>

<p>Attack Range is a project that stands up a small, throwaway lab — a Windows box, a Splunk server, some plumbing — lets you either sit there and generate <em>normal</em> activity or <em>run real attacks against it</em>, and forwards everything into Splunk so you can export the logs. It’s a fantastic idea. It’s also a gauntlet of small, undocumented failures, and this post is a map of every landmine I stepped on so you don’t have to.</p>

<p>Fair warning: this is a build log, not a “look how clean this was” tutorial. I got the range running and I’m still pulling data out of it. But every trap below is one I actually hit, with the actual fix.</p>

<h2 id="the-trap-that-matters-most-read-this-even-if-you-skip-the-rest">The trap that matters most (read this even if you skip the rest)</h2>

<p>Before any of the plumbing, here’s the conceptual landmine, because it’s the one that will quietly ruin your results while everything <em>looks</em> fine.</p>

<p>If your <strong>benign</strong> logs come from your clean home lab, and your <strong>malicious</strong> logs come from someone else’s public dataset, a machine-learning model doesn’t have to learn “attack vs. normal.” It can just learn to tell the two <em>environments</em> apart — different hostnames, different org IDs, different timestamp formats, different Splunk quirks. Your accuracy looks great. It’s a mirage. You built an environment detector, not an attack detector, and a reviewer will find it in about four seconds.</p>

<p>The fix is annoying but non-negotiable: <strong>get both classes from the same environment.</strong> That’s the whole reason I’m using Attack Range instead of just grabbing a public benign dataset. Build one range, capture a benign window, then run attacks <em>against that same range</em> and capture a malicious window. Now the only thing that differs between your two classes is the thing you actually care about.</p>

<p>Okay. On to the plumbing.</p>

<h2 id="where-it-actually-breaks">Where it actually breaks</h2>

<h3 id="docker-compose-isnt-installed-even-though-docker-is">Docker Compose isn’t installed (even though Docker is)</h3>

<p>Attack Range v5 runs as a set of Docker containers. So step one is <code class="language-plaintext highlighter-rouge">docker compose up</code>, and step one immediately fails because the Compose <em>plugin</em> isn’t there even though Docker is. Modern Docker split Compose into a plugin; on some setups you get the engine without it. Install the Compose plugin (or Docker Desktop, which bundles it) before you do anything else.</p>

<h3 id="the-docker-daemon-isnt-running">The Docker daemon isn’t running</h3>

<p>The next error looks scary and network-y, but it just means the Docker engine isn’t up. On Windows that means Docker Desktop literally isn’t launched. Start it, wait for the whale icon to stop animating, then retry. Embarrassingly simple, cost me more time than it should have because the error message points you at everything <em>except</em> “the app isn’t open.”</p>

<h3 id="home-isnt-a-thing-on-windows"><code class="language-plaintext highlighter-rouge">$HOME</code> isn’t a thing on Windows</h3>

<p>Attack Range assumes a Unix-y world and reaches for <code class="language-plaintext highlighter-rouge">$HOME</code>. On Windows PowerShell there’s no <code class="language-plaintext highlighter-rouge">$HOME</code> the way the tooling expects, so config lookups quietly point at nowhere. The fix:</p>

<div class="language-powershell highlighter-rouge"><div class="highlight"><pre class="highlight"><code><span class="nv">$</span><span class="nn">env</span><span class="p">:</span><span class="nv">HOME</span><span class="w"> </span><span class="o">=</span><span class="w"> </span><span class="nv">$</span><span class="nn">env</span><span class="p">:</span><span class="nv">USERPROFILE</span><span class="w">
</span></code></pre></div></div>

<p>Set that in the same shell you’re running everything from. Half the “file not found / can’t find credentials” weirdness after this point traces back to this one missing variable.</p>

<h3 id="the-credential-helper-that-doesnt-exist">The credential helper that doesn’t exist</h3>

<p>This one’s a gem. Docker’s config tries to use a credential <em>helper</em> to store login credentials securely — mine was set to <code class="language-plaintext highlighter-rouge">credsStore: "desktop"</code>, pointing at a helper binary that wasn’t actually on my machine. Every Docker operation that touches credentials then dies with an opaque <code class="language-plaintext highlighter-rouge">docker-credential-desktop not found</code> error.</p>

<p>Two fixes: either put the helper on your <code class="language-plaintext highlighter-rouge">PATH</code>, or just open <code class="language-plaintext highlighter-rouge">~/.docker/config.json</code> and delete the <code class="language-plaintext highlighter-rouge">credsStore</code> line entirely. I deleted it. For a throwaway lab you do not need the secure credential store, and it unblocks everything downstream instantly.</p>

<h3 id="the-range-boots-but-you-cant-connect-to-anything">The range boots, but you can’t connect to anything</h3>

<p>This is the one that nearly broke me. I got the whole range built and running in AWS — instances up, green, healthy — and then tried to reach the machines through <strong>Guacamole</strong> (the web-based remote-desktop gateway it ships with) and got nothing but connection errors on both the Splunk box and the Windows host.</p>

<p>I burned a lot of time assuming the range was broken. It wasn’t. <strong>Guacamole was the problem, not the instances.</strong> The moment I stopped trying to route through Guacamole and just hit the Splunk web UI <em>directly</em> at its own address (<code class="language-plaintext highlighter-rouge">http://&lt;splunk-ip&gt;:8000</code>), everything worked. I could search, I could see events, I could export. If your instances are running but Guacamole won’t connect, skip Guacamole and go straight to the service’s native port. Don’t debug the gateway when you can just walk around it.</p>

<h2 id="pulling-the-logs-out">Pulling the logs out</h2>

<p>Once you’re in the Splunk UI, the logs from every host get forwarded into one place, and you export by searching a time window and dumping raw events. Capture a <em>benign</em> window (leave the box alone, or better, do some normal work on it), note the start and end times, then search that window and export raw:</p>

<div class="language-plaintext highlighter-rouge"><div class="highlight"><pre class="highlight"><code>index=* sourcetype=XmlWinEventLog earliest=&lt;benign_start&gt; latest=&lt;benign_end&gt;
| table _raw
</code></pre></div></div>

<p>One thing that tripped me: the search view paginates, so a result set can <em>look</em> capped when it isn’t. If you want the honest count, ask for it directly — <code class="language-plaintext highlighter-rouge">... | stats count</code> — instead of trusting the number of rows you can scroll through. And don’t capture from a totally idle machine; an untouched box just emits the same background heartbeat over and over, and “benign = boring” is too easy a pattern. Generate some real activity first so your normal class looks like actual work.</p>

<p>Then do it again for a <em>malicious</em> window: run an attack simulation against the same range (Atomic Red Team techniques like PowerShell execution or credential dumping light up the logs nicely), note <em>that</em> window, and export it too. Matched pairs, same environment, problem solved.</p>

<h2 id="the-honest-takeaway">The honest takeaway</h2>

<p>Attack Range is the “right” way to do this, and when it works it’s genuinely great — matched benign and malicious telemetry from one clean environment is exactly what the science needs. But it is a <em>cloud</em> tool with a <em>cloud</em> bill and a long tail of small failures, and I want to be honest that I spent an afternoon yak-shaving Docker before I got a single log out of it.</p>

<p>So here’s the thing I wrote into my own project docs, and I’ll say it here too: sometimes the proper path is a rabbit hole. If all you need is benign <em>endpoint</em> data and you don’t need the cloud or network domains, a plain Windows VM with <strong>Sysmon</strong> installed, doing normal activity for an hour, gets you maybe 80% of the value with none of the setup pain and none of the AWS charges. Reach for the full range when you specifically need matched attack-and-benign pairs from one environment — which, in my case, I do. For everything else, the boring local option is often the smart one.</p>

<p>I’ll update this once I’ve fully pulled my matched dataset out and fed it into the project. If you’re standing up Attack Range yourself and hit a wall I didn’t list here, tell me — I’ll add it to the map.</p>]]></content><author><name>Damian Villarreal</name></author><category term="security" /><category term="splunk" /><category term="homelab" /><category term="logs" /><category term="notes" /><summary type="html"><![CDATA[Why I was doing this at all]]></summary></entry><entry><title type="html">FeDAPT: Can Rival Security Teams Train One AI Without Sharing Their Secrets?</title><link href="https://damianvillarreal.com/blog/2026/08/04/fedapt-training-a-security-ai-without-sharing-secrets/" rel="alternate" type="text/html" title="FeDAPT: Can Rival Security Teams Train One AI Without Sharing Their Secrets?" /><published>2026-08-04T12:00:00+00:00</published><updated>2026-08-04T12:00:00+00:00</updated><id>https://damianvillarreal.com/blog/2026/08/04/fedapt-training-a-security-ai-without-sharing-secrets</id><content type="html" xml:base="https://damianvillarreal.com/blog/2026/08/04/fedapt-training-a-security-ai-without-sharing-secrets/"><![CDATA[<h2 id="the-problem-i-keep-running-into">The problem I keep running into</h2>

<p>Security Operations Centers (SOCs) are drowning. Analysts have to make sense of a firehose of telemetry that spans wildly different worlds — endpoint process trees from Sysmon, network traffic from Zeek, cloud audit logs from AWS CloudTrail — and they have to do it fast, at 2 AM, while three other alerts are screaming for attention.</p>

<p>Large Language Models look like a natural fit here: an assistant that can read a nasty log snippet and explain, in plain English, “here’s what’s happening and why it’s suspicious.” But if you try to actually build one, you smack into two walls almost immediately.</p>

<p><strong>Wall one: specialization vs. privacy.</strong> No single organization has enough variety in its own logs to train a well-rounded security assistant. The obvious fix — pool everyone’s telemetry into one big training set — is a non-starter. That data is some of the most sensitive stuff an org owns. GDPR, HIPAA, customer contracts, and plain competitive paranoia all say <em>no, you cannot ship your raw logs to a shared training server.</em></p>

<p><strong>Wall two: logs aren’t language.</strong> A raw Sysmon XML blob or a CloudTrail JSON event has no natural-language explanation attached to it. A good assistant has to bridge the gap between the machine artifact and the human sentence.</p>

<p>So I’ve been building a research project this summer to chip away at exactly this. I’m calling it <strong>FeDAPT</strong> — Federated Domain-Adaptive Pre-Training. The question at the center of it is simple to state and annoyingly hard to answer:</p>

<blockquote>
  <p><em>Can a network of security organizations collaboratively train a better security-assistant LLM without any of them sharing their private data?</em></p>
</blockquote>

<p>This post is a build log, not a victory lap. The framework and the whole data-and-evaluation pipeline are built and tested; the big training experiments are still ahead of me. I want to walk through the design decisions I’m proud of, and — because this blog is about what I <em>build and break</em> — the things that broke along the way.</p>

<h2 id="the-core-idea-split-knowledge-from-grounding">The core idea: split knowledge from grounding</h2>

<p>The trick that makes FeDAPT work is a clean split between two kinds of data.</p>

<ul>
  <li><strong>Shared knowledge is prose.</strong> Public, natural-language security text — MITRE ATT&amp;CK write-ups, Sigma detection-rule descriptions, CVE summaries, CISA advisories, vendor threat reports. This teaches the model security <em>language and reasoning</em>. It’s public, so it’s safe to pool.</li>
  <li><strong>Private grounding is logs.</strong> Each organization’s raw telemetry. This is the sensitive stuff, and it <em>never leaves the building.</em></li>
</ul>

<p>Once you see the data that way, the architecture falls out of it naturally. FeDAPT runs in two stages:</p>

<p><strong>Stage 1 — Federated pre-training on prose (the collaboration).</strong> Every participating org trains on the shared prose corpus, but instead of sending their data anywhere, they only send tiny model <em>updates</em> to a coordinating server, which averages them into one shared adapter. The raw text stays put; only the learned weights travel. This is the only stage where anything crosses an organization’s boundary.</p>

<p><strong>Stage 2 — Local tuning on logs (the private part).</strong> Each org takes that shared adapter and fine-tunes it <em>locally</em> on its own log-to-explanation examples. The logs stay home. The org ends up with an assistant that knows general security reasoning <em>and</em> is grounded in its own environment.</p>

<p>To keep this cheap enough to actually run, the model only ever trains small LoRA adapters on top of a frozen 7-billion-parameter base — so we’re moving megabytes of adapter weights around, not gigabytes of full models.</p>

<h2 id="how-do-you-prove-the-collaboration-was-worth-it">How do you prove the collaboration was worth it?</h2>

<p>This is the part I care about most, because it’s easy to hand-wave. If FeDAPT just “seems better,” that’s worthless. So the whole study is built around one controlled comparison. I train the <em>exact same</em> final task-tuning step from four different starting points:</p>

<ul>
  <li><strong>A — no pre-training at all.</strong></li>
  <li><strong>B — the org pre-trained <em>alone</em> on its own slice of prose.</strong></li>
  <li><strong>C — the org used the <em>federated</em> shared adapter.</strong></li>
  <li><strong>D — a fantasy world where everyone pooled data into one central model (the ceiling if privacy were free).</strong></li>
</ul>

<p>Only the starting point changes, so any difference in the final assistant is attributable to it. The number I’m chasing is <strong>C minus B</strong>: the gap between using the federated model and going it alone. That single number <em>is</em> the value of joining the network — the whole premise of the project stands or falls on it.</p>

<h2 id="making-it-trustworthy-this-is-where-it-gets-fun">Making it trustworthy (this is where it gets fun)</h2>

<p>A federated system that only works when everyone is honest and nothing leaks isn’t a security system. So a big chunk of the work is the adversarial and privacy machinery:</p>

<ul>
  <li><strong>Differential privacy.</strong> Before an org’s update is shared, it gets clipped and dosed with calibrated noise, and a proper accountant (Opacus’s RDP) tracks the exact privacy budget spent. So even the <em>weight updates</em> can’t be reverse-engineered back into someone’s data.</li>
  <li><strong>Byzantine robustness.</strong> What if one of the “organizations” is malicious — sending poisoned updates to wreck the shared model? I simulate that (sign-flipping, blowing up the update magnitude, random noise, and data poisoning) and pit plain averaging against robust aggregators like Krum and trimmed-mean. The story I expect: plain averaging collapses under attack; the robust ones hold.</li>
</ul>

<p>And then there’s the honesty tax — the stuff that’s tempting to sweep under the rug:</p>

<ul>
  <li><strong>The labels are messier than they look.</strong> My attack telemetry (from Splunk’s public <code class="language-plaintext highlighter-rouge">attack_data</code>) is labeled at the <em>whole-capture</em> level, not per line. A single capture is mostly normal background noise with an attack buried in it somewhere. So I reframed the “is this bad?” task honestly: <em>does this activity contain evidence of an attack?</em> — not “is this exact line malicious,” which the labels can’t actually support.</li>
  <li><strong>Grading free-form answers is hard.</strong> You can’t score “explain this log” with a simple string match. So the primary metric is an <strong>LLM-as-a-judge</strong> (following a method called CLEV): a separate, independent model reads the answer against a reference and votes correct/incorrect. But — and this is the part people skip — <em>you have to validate the judge against a human first.</em> I built the tooling to hand-label ~50 examples and measure whether the judge actually agrees with me (Cohen’s κ and macro-F1) before trusting a single number it produces.</li>
</ul>

<h2 id="what-broke">What broke</h2>

<p>Per the theme of this blog. A few of my favorites:</p>

<p><strong>The silent bug that quietly poisoned my data.</strong> I use a strong “teacher” model to synthesize the training targets. One long run generated beautiful outputs for three of my four tasks — and then, when I inspected the fourth, <em>every single one of the 400 examples</em> was a useless one-line template. The teacher had hit an API rate limit partway through, every call errored, and my code was <strong>silently swallowing the errors and falling back to a placeholder.</strong> I only found it because I audited the data by hand. Lesson burned in: never let a failure fall back silently. I added retry-with-backoff <em>and</em> a loud “X of Y targets fell back!” warning so a future run can’t hide this from me.</p>

<p><strong>The git-LFS pointer trap.</strong> My attack data lives in a ~9 GB git-LFS repo, so I only pulled a subset. Problem: the files I <em>didn’t</em> pull still exist on disk — as tiny “pointer” stub files. My loader happily read those stubs and turned <code class="language-plaintext highlighter-rouge">version https://git-lfs.github.com/...</code> into fake “log records.” So I nearly trained on git plumbing text labeled as security telemetry. Now the loader detects and skips LFS pointers.</p>

<p><strong>The Attack Range yak-shave.</strong> I still needed <em>benign</em> logs (the “this is normal” class) to balance the malicious ones, and the clean way to get them is to stand up a lab with Splunk’s Attack Range. That turned into an afternoon of: Docker Compose plugin missing → Docker daemon not running → a credential-helper that didn’t exist → Windows <code class="language-plaintext highlighter-rouge">$HOME</code> isn’t a thing → cloud instances that boot but won’t accept connections. I got the range running in AWS and I’m still fighting to pull the logs out of it. The honest takeaway I wrote into my own docs: sometimes the “proper” path is a rabbit hole, and a local Sysmon capture on one machine gets you 80% of the value with none of the cloud bill.</p>

<h2 id="where-its-at-and-whats-next">Where it’s at, and what’s next</h2>

<p>Right now: the full pipeline exists as a clean, tested Python package — data collection, the non-IID split across six simulated organizations, the four tasks, the federated training loop, differential privacy, the Byzantine attacks, and the judge. Roughly 35,000 documents of security prose and a few hundred labeled log examples are built and audited. There’s a one-command “smoke test” that runs the entire thing end-to-end on a tiny config so I can catch integration bugs before spending real GPU hours.</p>

<p>What’s left is the actual research: getting the benign logs in, running the full experiment matrix on a GPU across multiple seeds, and reading off that C−B number. If federated pre-training recovers most of the centralized ceiling while every org’s logs stay home, that’s the result. If it doesn’t, that’s <em>also</em> a result — an honest, still-interesting one.</p>

<p>I’m planning to open-source the whole thing soon. If the idea of “rival organizations pooling knowledge without pooling secrets” is interesting to you, I’d love to hear it — and I’ll post the repo and the numbers here once the runs are done.</p>]]></content><author><name>Damian Villarreal</name></author><category term="ongoing" /><category term="project" /><category term="security" /><category term="ai" /><category term="federated-learning" /><category term="llm" /><summary type="html"><![CDATA[The problem I keep running into]]></summary></entry><entry><title type="html">Simplified Security Visibility: CloudWatch Unified Data Store</title><link href="https://damianvillarreal.com/blog/2026/07/27/simplified-security-visibility-cloudwatch-unified-data-store/" rel="alternate" type="text/html" title="Simplified Security Visibility: CloudWatch Unified Data Store" /><published>2026-07-27T00:00:00+00:00</published><updated>2026-07-27T00:00:00+00:00</updated><id>https://damianvillarreal.com/blog/2026/07/27/simplified-security-visibility-cloudwatch-unified-data-store</id><content type="html" xml:base="https://damianvillarreal.com/blog/2026/07/27/simplified-security-visibility-cloudwatch-unified-data-store/"><![CDATA[<h2 id="overview">Overview</h2>
<p>In this project, the goal is to learn how to centralize, query, and act on security telemetry using CloudWatch’s Unified Data Store. I’ll be walking through some hands-on labs that cover CloudTrail ingestion, interactive security analytics with Logs Insights, anomaly detection, and cross-source investigation scenarios.</p>

<p>This project was built as part of AWS’s Security Visibility and Analytics Activation Day. Security Visibility and Analytics Activation Day provides hands-on experience with AWS CloudTrail Events in the Amazon CloudWatch unified data store. Learn to capture account activity and resource operations for auditing, compliance, and troubleshooting.</p>

<p><strong>Topics</strong>: Analytics, Cloud Operations, Security, Identity, and Compliance</p>

<p><strong>AWS Services</strong>: Amazon CloudWatch Logs, Amazon CloudWatch, AWS CloudTrail</p>

<h2 id="foundations-of-uds">Foundations of UDS</h2>
<p><strong>Amazon CloudWatch unified data store (UDS)</strong> ingests security log sources from AWS Cloudtrail, S3, VPC Flow Logs, AWS WAF,a nd DNS in Route 53.</p>

<h3 id="reviewing-telemetry-collection">Reviewing telemetry collection</h3>
<p>Telemetry <strong>enablement rules</strong> is how the UDS collects logs from a source without manual trail setup, destination buckets, or custom IAM. Each rule names a data source and a destination (CloudWatch Logs).</p>

<p>For AWS CloudTrail specifically, the rule can also carry <strong>advanced event selectors</strong> that scope which data events are captured.</p>

<h4 id="cloudtrail-telemetry-rules">Cloudtrail telemetry rules</h4>
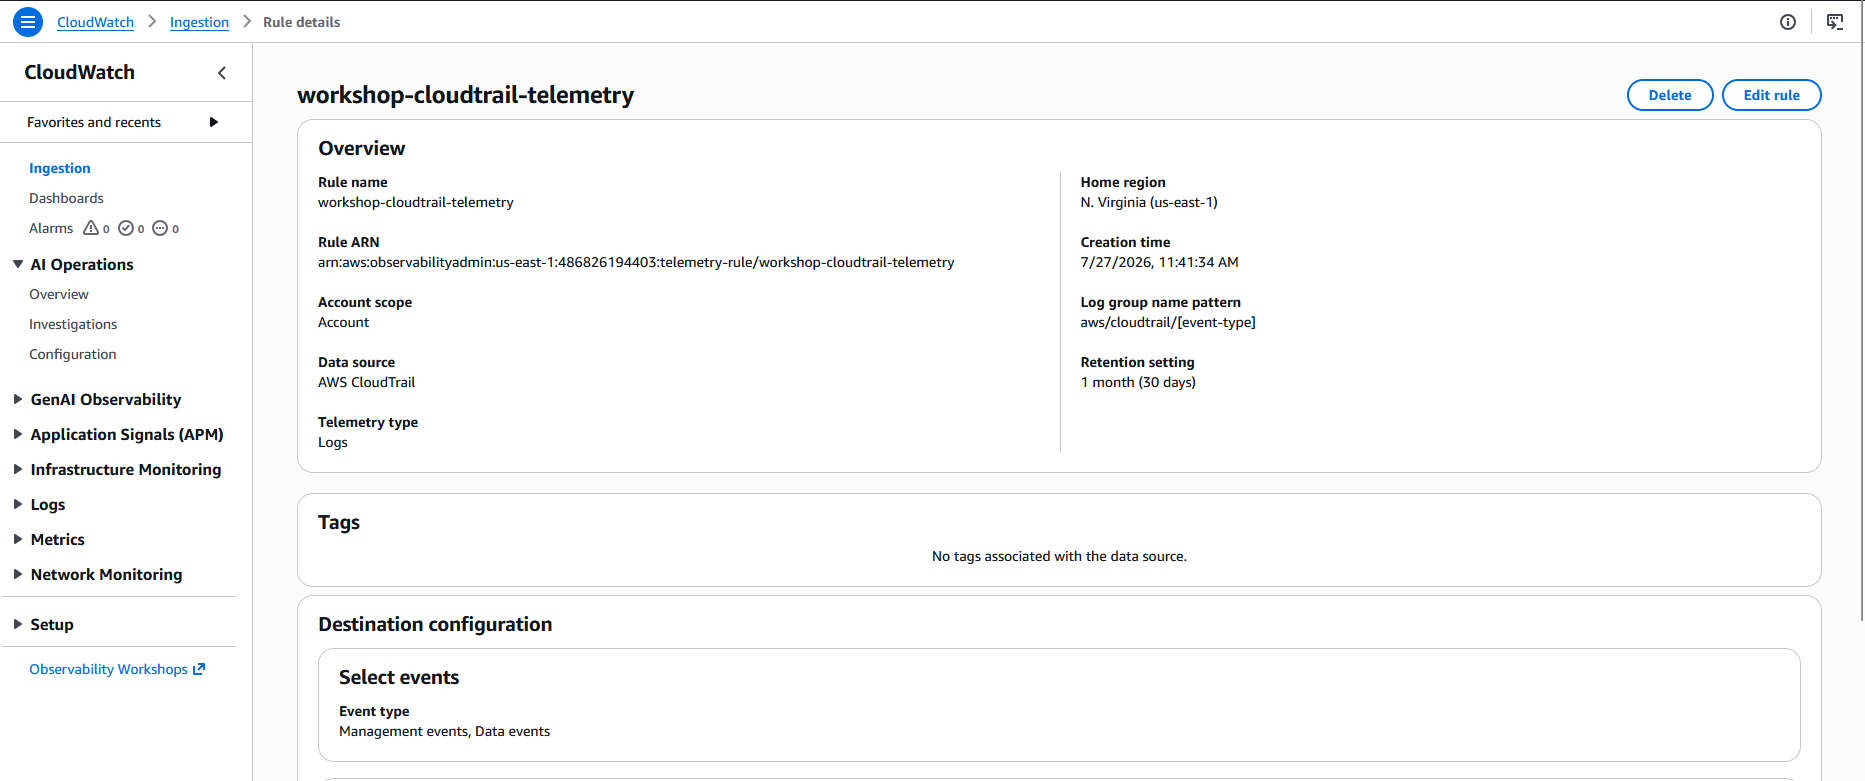
<p>Cloudtrail captures the <em>identity</em> view of activity: who called which API, from where, with what result.</p>

<p><img src="/assets/1.png" alt="1.png" /></p>

<p>From the screenshot, we can see that the <strong>Data source</strong> is AWS CloudTrail, the <strong>Destination</strong> is CloudWatch Logs, managed log group pattern <code class="language-plaintext highlighter-rouge">aws/cloudtrail/[event-type]</code>, and the event types are both Management events and Data events.</p>
<ul>
  <li><strong>Management events</strong>: all account-wide API activity. Think of them as the control plane. Management events detail who opened the metaphorical door.</li>
  <li><strong>Data events</strong>: object-level operations, like S3 or Lambda. These events deal with the access or modification of data. You can think of them as the logs of who accessed the metaphorical safe.
    <ul>
      <li>Importantly, Data events are turned off by default. This is because they can be extremely noisy - imagine how many times you might access buckets, invoke Lambda functions, or any other operations. You can see how this might be overwhelming.</li>
    </ul>
  </li>
</ul>

<h4 id="why-advanced-event-selectors-matter">Why advanced event selectors matter</h4>
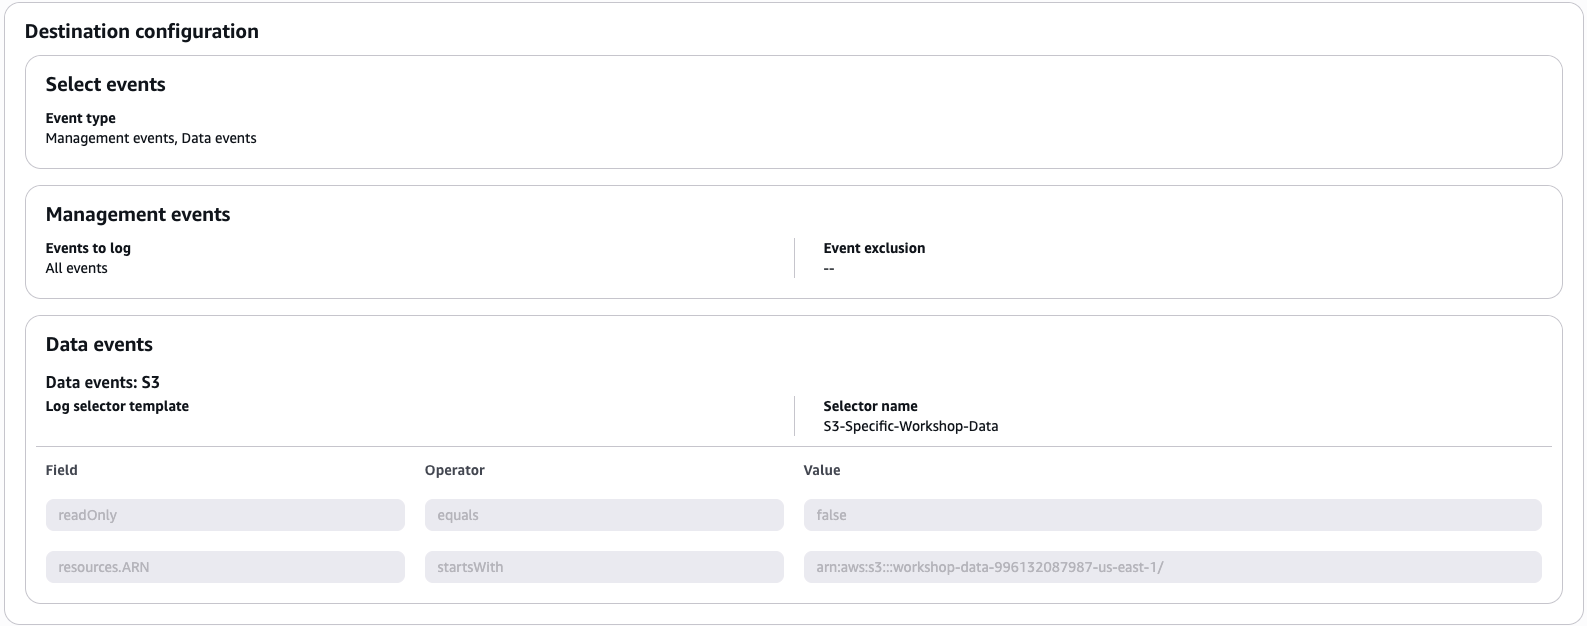
<p>Data event are high-volume, so the rule uses <strong>advanced event selectors</strong> to capture only what’s relevant: a key cost-control and signal-to-noise technique that can be applied to any high-volume source. The rule we have has two selectors:</p>
<ol>
  <li>Management events - captures all management events (<code class="language-plaintext highlighter-rouge">eventCategory = Management</code>).</li>
  <li>Scoped S3 data events (<code class="language-plaintext highlighter-rouge">S3-Specific-Workshop-Data</code>) - captures only <strong>write</strong> operations on the workshop data bucket:
    <ul>
      <li><strong>Field</strong>: readOnly <strong>Equals</strong> <code class="language-plaintext highlighter-rouge">false</code></li>
      <li><strong>Field</strong>: resources.ARN <strong>startsWith</strong> <code class="language-plaintext highlighter-rouge">arn:aws:s3:::workshop-data-${AccountID-${Region}</code></li>
    </ul>
  </li>
</ol>

<p><img src="/assets/2.png" alt="2.png" /></p>

<h4 id="the-technique-to-take-home">The technique to take home</h4>
<p>The <code class="language-plaintext highlighter-rouge">readOnly = false + resources.ARN startsWith</code> combination is the pattern to remember: log only write operations on a specific bucket, cutting data-event volume while guaranteeing delivery for the mutations that matter most. This is how you’d scope CloudTrail data events in production.</p>

<h4 id="reviewing-s3-server-access-log-telemetry-rule">Reviewing S3 server access log telemetry rule</h4>
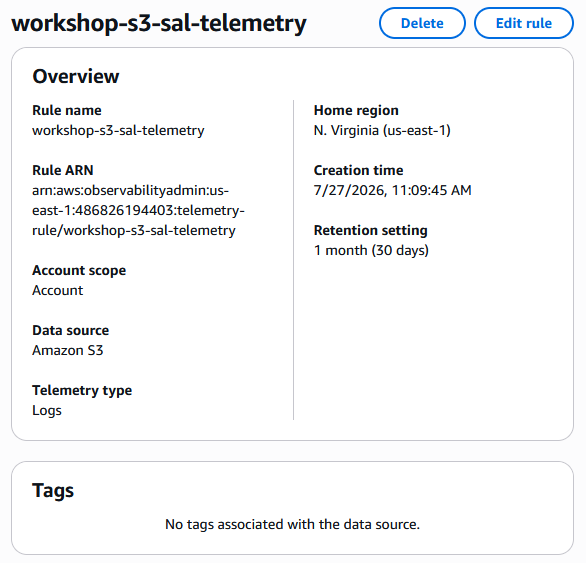
<p>S3 servr access logs are the complementary source. They add the <em>HTTP-level</em> view of every bucket request (TLS version, bytes transferred, signature version) that Cloudtrail <strong>does not record</strong>.</p>

<p><img src="/assets/3.png" alt="3.png" /></p>

<p>We can see from the image that the enablement rule takes the same shape as the CloudTrail rule.</p>

<h3 id="understanding-cloudwatch-telemetry-pipelines">Understanding CloudWatch telemetry pipelines</h3>
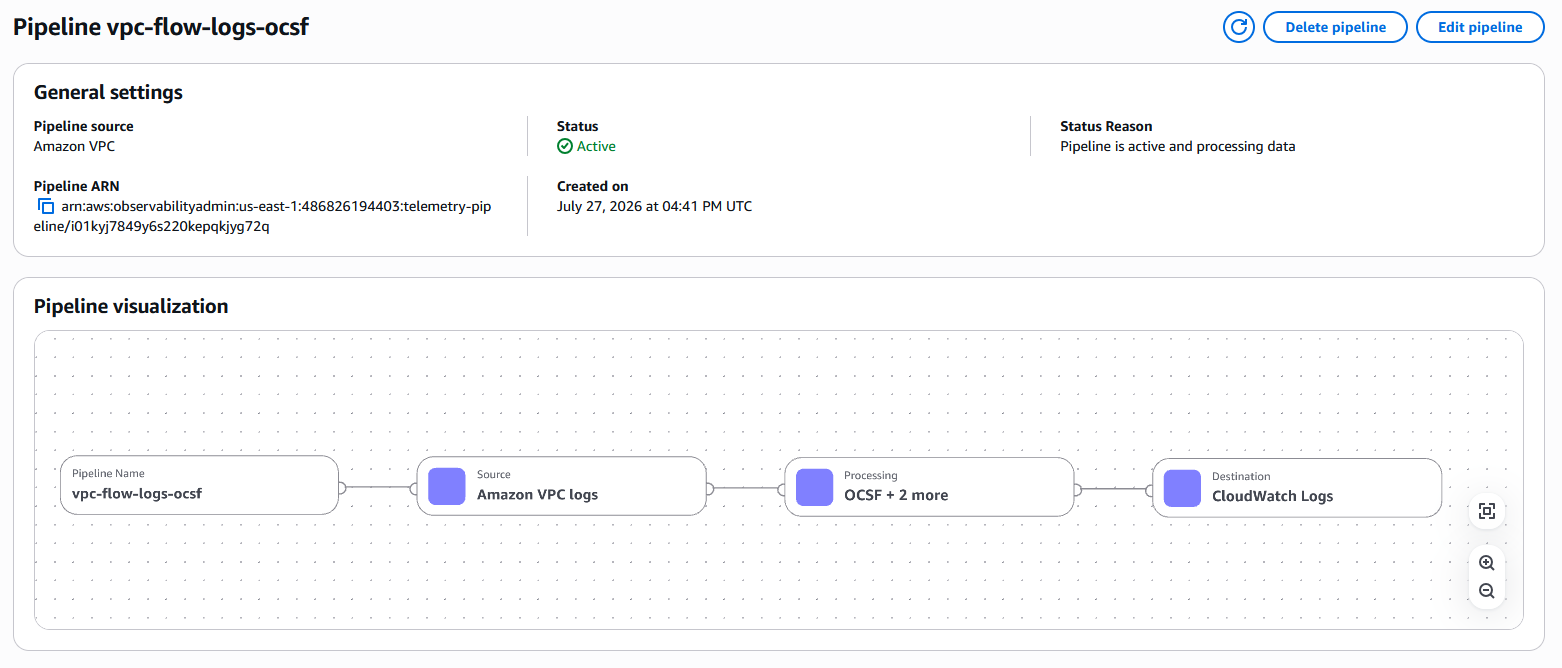
<p>A <strong>CloudWatch telemetry pipeline</strong> transforms raw logs as they’re ingested. It reads from a source, runs the records through one or more processers, and writes the result to a destination.</p>

<p>One of the most common processors is the OCSF processor, which normalizes logs into the <strong>Open Cybersecurity Schema Framework</strong>.</p>

<h4 id="why-normalize">Why normalize?</h4>
<p>Why normalize to OCSF? Native AWS log formats are service-specific. OCSF gives you consistent field names and structures across security tools and platforms, which helps multi-vendor SOCs and SIEMs and lets you correlate multiple AWS log sources in one query.</p>

<p><img src="/assets/4.png" alt="4.png" /></p>

<p>Here’s the pipeline’s definition as code:</p>

<div class="language-yaml highlighter-rouge"><div class="highlight"><pre class="highlight"><code><span class="na">pipeline</span><span class="pi">:</span>
  <span class="na">source</span><span class="pi">:</span> <span class="c1"># reads the source identified by a data_source_name / data_source_type pair</span>
    <span class="na">cloudwatch_logs</span><span class="pi">:</span>
      <span class="na">aws</span><span class="pi">:</span>
        <span class="na">sts_role_arn</span><span class="pi">:</span> <span class="s">arn:aws:iam::486826194403:role/security-visibility-worksho-VpcFlowOcsfPipelineRole-uDQp4iuRBf1X</span>
      <span class="na">log_event_metadata</span><span class="pi">:</span>
        <span class="na">data_source_name</span><span class="pi">:</span> <span class="s">amazon_vpc</span>
        <span class="na">data_source_type</span><span class="pi">:</span> <span class="s">flow</span>
  <span class="na">processor</span><span class="pi">:</span>
    <span class="pi">-</span> <span class="na">ocsf</span><span class="pi">:</span>
        <span class="na">schema</span><span class="pi">:</span>
          <span class="na">vpc_flow</span><span class="pi">:</span> <span class="no">null</span>
        <span class="na">version</span><span class="pi">:</span> <span class="s2">"</span><span class="s">1.5"</span>
        <span class="na">mapping_version</span><span class="pi">:</span> <span class="s">1.5.0</span>
    <span class="pi">-</span> <span class="na">copy_values</span><span class="pi">:</span>
        <span class="na">when</span><span class="pi">:</span> <span class="s">connection_info.protocol_num != </span><span class="no">null</span>
        <span class="na">entries</span><span class="pi">:</span>
          <span class="pi">-</span> <span class="na">from_key</span><span class="pi">:</span> <span class="s">connection_info.protocol_num</span>
            <span class="na">to_key</span><span class="pi">:</span> <span class="s">protocol_name</span>
            <span class="na">overwrite_if_to_key_exists</span><span class="pi">:</span> <span class="no">false</span>
    <span class="pi">-</span> <span class="na">substitute_string</span><span class="pi">:</span>
        <span class="na">when</span><span class="pi">:</span> <span class="s">protocol_name != </span><span class="no">null</span>
        <span class="na">entries</span><span class="pi">:</span>
          <span class="pi">-</span> <span class="na">source</span><span class="pi">:</span> <span class="s">protocol_name</span>
            <span class="na">from</span><span class="pi">:</span> <span class="s">^6$</span>
            <span class="na">to</span><span class="pi">:</span> <span class="s">TCP</span>
          <span class="pi">-</span> <span class="na">source</span><span class="pi">:</span> <span class="s">protocol_name</span>
            <span class="na">from</span><span class="pi">:</span> <span class="s">^17$</span>
            <span class="na">to</span><span class="pi">:</span> <span class="s">UDP</span>
          <span class="pi">-</span> <span class="na">source</span><span class="pi">:</span> <span class="s">protocol_name</span>
            <span class="na">from</span><span class="pi">:</span> <span class="s">^1$</span>
            <span class="na">to</span><span class="pi">:</span> <span class="s">ICMP</span>
  <span class="na">sink</span><span class="pi">:</span> <span class="c1"># log_group: "@original" sends the transformed records back to the originating log group. For a cloudwatch_logs source this is the only allowed value: the pipeline transforms the records in place as they're ingested.</span>
    <span class="pi">-</span> <span class="na">cloudwatch_logs</span><span class="pi">:</span>
        <span class="na">log_group</span><span class="pi">:</span> <span class="s2">"</span><span class="s">@original"</span> 
</code></pre></div></div>

<p>One important concept to understand is that the processors have an order to them. There’s a reason why <code class="language-plaintext highlighter-rouge">oscf:</code> comes first, then <code class="language-plaintext highlighter-rouge">copy_values</code>, then <code class="language-plaintext highlighter-rouge">substitute_string</code>.</p>

<table>
  <thead>
    <tr>
      <th>#</th>
      <th>Processor</th>
      <th>What it does</th>
      <th>Why it matters</th>
    </tr>
  </thead>
  <tbody>
    <tr>
      <td>1</td>
      <td><code class="language-plaintext highlighter-rouge">oscf</code></td>
      <td>Normalizes each VPC flow record into the OCSF vpc_flow schema (v1.5). Raw fields become standardized OCSF paths (e.g. byte counts → traffic.bytes, the protocol number → connection_info.protocol_num).</td>
      <td>One consistent schema you can correlate against other OCSF sources.</td>
    </tr>
    <tr>
      <td>2</td>
      <td><code class="language-plaintext highlighter-rouge">copy_values</code></td>
      <td>Copies connection_info.protocol_num into a new protocol_name field — but only when the protocol number is present.</td>
      <td>Adds a derived field without losing the original. Conditional (when) means it only fires on records that have the source field.</td>
    </tr>
    <tr>
      <td>3</td>
      <td><code class="language-plaintext highlighter-rouge">substitute_string</code></td>
      <td>Rewrites the protocol_name value: 6 → TCP, 17 → UDP, 1 → ICMP.</td>
      <td>Enrichment so, for example, you don’t have to remember that IANA protocol 6 means TCP.</td>
    </tr>
  </tbody>
</table>

<h2 id="investigate">Investigate</h2>
<h3 id="ai-powered-query-generation-and-summarization">AI-powered query generation and summarization</h3>
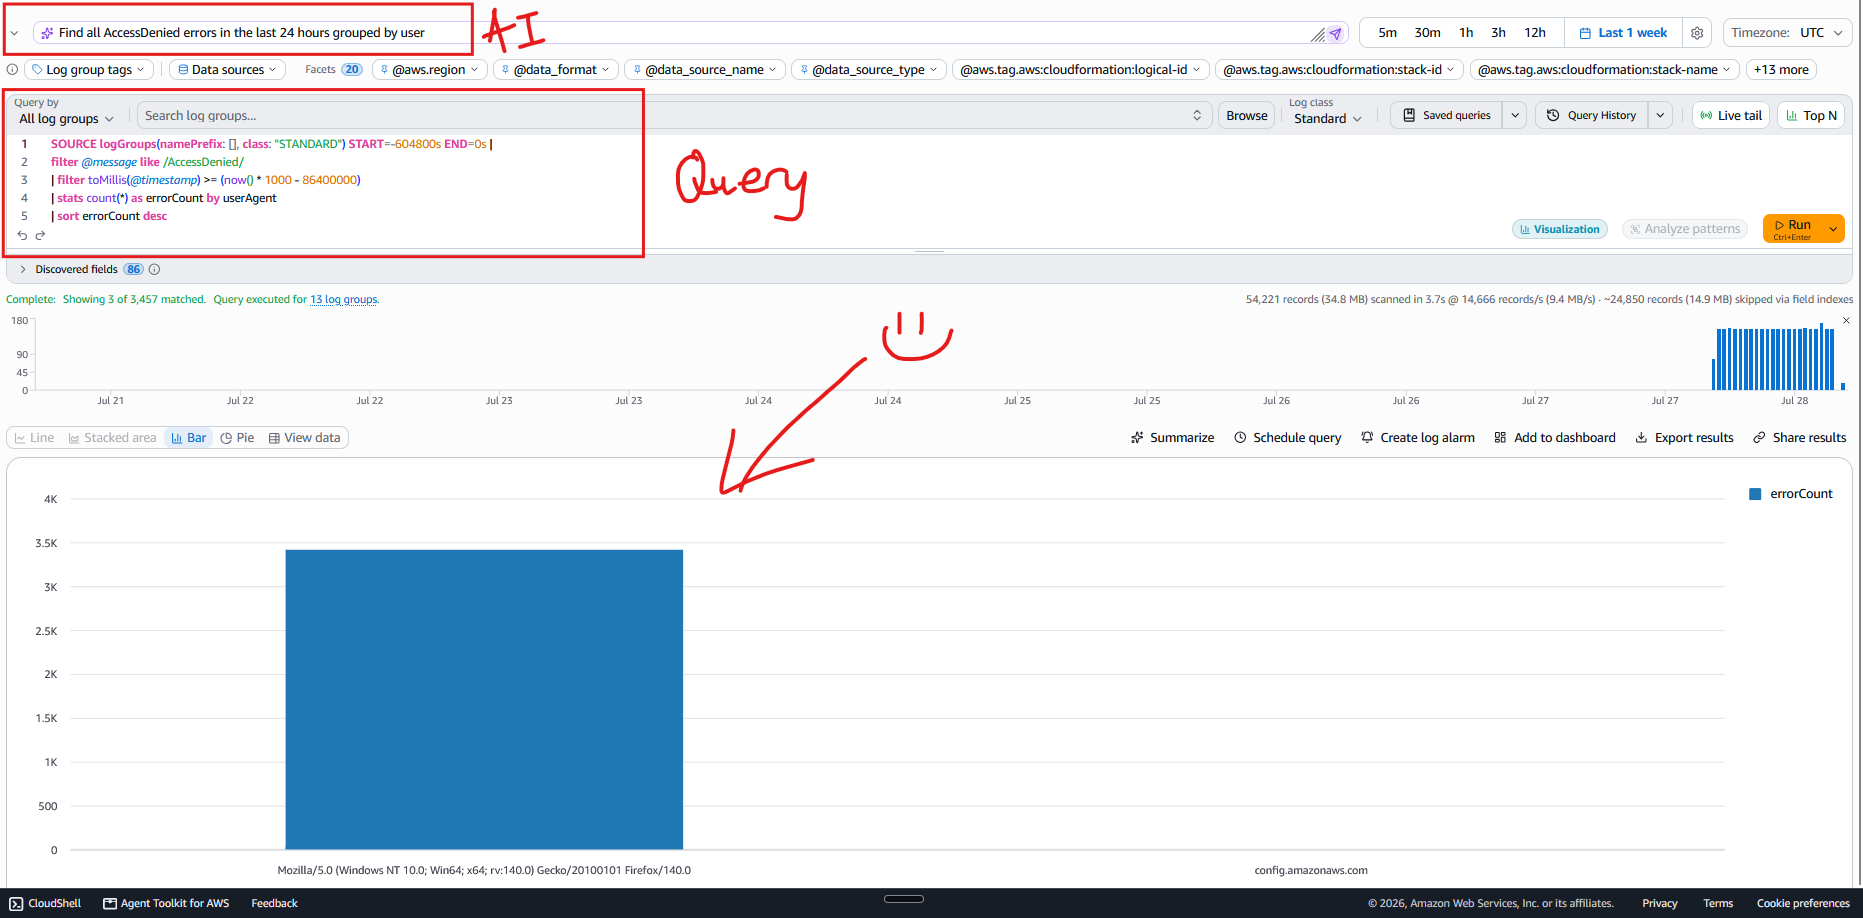
<p>CloudWatch Logs Insights supports a natural language query capability to help you generate and update queries for CloudWatch Logs Insights QL, OpenSearch SQL, and OpenSearch PPL. You can use plain English prompts to automatically generate queries without learning complex syntax. Below, I’ve asked the AI to “Find all AccessDenied errors in the last 24 hours grouped by user”.</p>

<p><img src="/assets/5.png" alt="5.png" /></p>

<p>Once you’ve run your query, you can again ask the AI to summarize the data. Here’s the AI summary:</p>

<blockquote>
  <p>The logs show 3,457 total AccessDenied errors across three user agent categories. The dominant source is requests with no user agent, accounting for 3,420 errors, which represents approximately 98.9% of all AccessDenied occurrences. Firefox 140.0 on Windows 10 (64-bit) is the second-largest source with 33 errors. The AWS Config service endpoint (config.amazonaws.com) contributed 4 errors. The concentration of errors in the no-user-agent category is notably disproportionate compared to the browser and AWS service sources.</p>
</blockquote>

<p>These features are powered by Amazon Bedrock.</p>

<h3 id="querying-with-ql-sql-and-ppl">Querying with QL, SQL, and PPL</h3>
<p>CloudWatch Logs Insights supports three query languages so you can use whichever fits the task: Logs Insights QL (the native language, optimized for CloudWatch), OpenSearch PPL (piped commands, Unix-pipe style), and OpenSearch SQL (familiar relational syntax).</p>

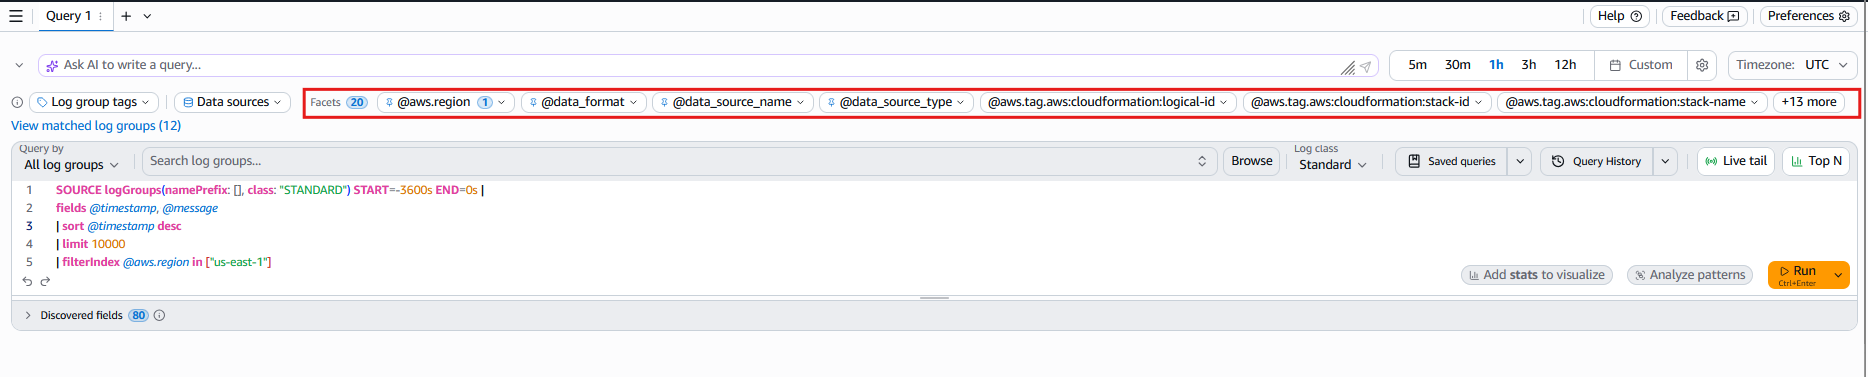
<h3 id="interactive-log-exploration-with-facets">Interactive log exploration with facets</h3>
<p>CloudWatch Logs Insights facets enable interactive log analysis by allowing you to filter query results through point-and-click selection.</p>

<p><img src="/assets/6.png" alt="6.png" /></p>

<p>To learn more about facets, correlation, enrichment, automation in CloudWatch Log Analytics, go to <a href="https://aws.amazon.com/blogs/mt/log-analysis-with-facets-correlation-enrichment-and-automation-in-amazon-cloudwatch-log-analytics/">this Amazon blog post</a>.</p>

<p>The key takeaway is this: <strong>Facets</strong> are for exploring log data visually without writing a query.</p>

<h3 id="enriching-and-correlating-across-sources">Enriching and correlating across sources</h3>
<p>CloudWatch Log Analytics provides four building blocks for enrichment and correlation: <strong>lookup tables, parameterized queries, JOIN, and sub-queries</strong>.</p>

<ol>
  <li><strong>Lookup tables</strong> for enriching query results with external metadata.</li>
  <li><strong>Parameterized</strong> <strong>queries</strong> for saving reusable templates with fill-in variables.</li>
  <li><strong>JOIN</strong> and <strong>sub-queries</strong> for correlating data across log groups in a single query. The primary query runs against one log group. The JOIN pulls matching events from a second log group based on a shared field, such as an IP address, user ID, or request ID.</li>
  <li><strong>Scheduled</strong> <strong>queries</strong> for running queries automatically and delivering results to Amazon Simple Storage Service (Amazon S3) or Amazon EventBridge.</li>
</ol>

<p>Again, if you would like more information, please visit the above Amazon blog post as they also provide a lab you can do as well.</p>

<h2 id="detect-and-alert">Detect and alert</h2>
<h3 id="metric-filters">Metric filters</h3>
<p>A metric filter turns a log pattern into a CloudWatch metric, and a CloudWatch alarm notifies you when that metric crosses a threshold.</p>

<p>To go more into detail:</p>
<ol>
  <li>A <strong>metric filter</strong> scans a log group for a pattern and increments a CloudWatch metric on each match, converting raw logs into a quantifiable, alarmable signal. Because the unified data store delivers logs as structured JSON, filters use JSON match syntax ($.field) regardless of source.</li>
  <li><strong>CloudWatch alarms</strong> turn the metrics from your metric filters into action, notifying your team the moment a security pattern crosses a threshold. The mechanism is identical across sources: pick a metric, set a threshold and evaluation period, and attach an SNS notification. Even a single occurrence can trigger an alarm when that’s the right policy.</li>
</ol>

<h2 id="rank-and-visualize">Rank and visualize</h2>
<p><strong>Contributor Insights</strong> continuously ranks the top contributors to a pattern (top requesters generating errors, top downloaders by volume), and those rankings, together with your metrics and alarms, come together on a CloudWatch dashboard, the single pane your team watches.</p>

<p>You can build Contributor Insights rules for CloudTrail and S3 server access logs from scratch, or deploy a pre-built Security, Compliance &amp; Audit dashboard from CloudFormation.</p>

<h3 id="contributor-insights">Contributor Insights</h3>
<p>CloudWatch Contributor Insights continuously analyzes a log group and ranks the top-N contributors to a pattern (the principals, IPs, or buckets driving the most activity) without you running queries by hand. The rule body uses JSON match syntax and names a contribution key (what to rank by), filters, and an aggregation.</p>

<h2 id="advanced-analytics">Advanced analytics</h2>
<p>So far, everything we have been doing has been within CloudWatch. However, we can extend the UDS outwards. For example, we can query normalized security data with Apache Iceberg-compatible tools (Amazon Athena via S3 Tables) for large-scale, SQL-based analysis and long-term retention, and apply AI-assisted threat detection to surface patterns across sources.</p>]]></content><author><name>Damian Villarreal</name></author><category term="notes" /><category term="workshop" /><category term="cybersecurity" /><category term="aws" /><category term="cloudwatch" /><category term="cloudtrail" /><summary type="html"><![CDATA[Overview In this project, the goal is to learn how to centralize, query, and act on security telemetry using CloudWatch’s Unified Data Store. I’ll be walking through some hands-on labs that cover CloudTrail ingestion, interactive security analytics with Logs Insights, anomaly detection, and cross-source investigation scenarios.]]></summary><media:thumbnail xmlns:media="http://search.yahoo.com/mrss/" url="https://damianvillarreal.com/assets%5Ccloudwatch-thumbnail.png" /><media:content medium="image" url="https://damianvillarreal.com/assets%5Ccloudwatch-thumbnail.png" xmlns:media="http://search.yahoo.com/mrss/" /></entry><entry><title type="html">Building in AWS: Helping Subcontractors Bid on Bigger Contracts</title><link href="https://damianvillarreal.com/blog/2026/07/22/building-in-AWS-helping-subcontractors-bid-on-bigger-contracts/" rel="alternate" type="text/html" title="Building in AWS: Helping Subcontractors Bid on Bigger Contracts" /><published>2026-07-22T01:09:00+00:00</published><updated>2026-07-22T01:09:00+00:00</updated><id>https://damianvillarreal.com/blog/2026/07/22/building-in-AWS-helping-subcontractors-bid-on-bigger-contracts</id><content type="html" xml:base="https://damianvillarreal.com/blog/2026/07/22/building-in-AWS-helping-subcontractors-bid-on-bigger-contracts/"><![CDATA[<h2 id="introduction">Introduction</h2>

<p>Construction in the Rio Grande Valley (RGV) is becoming a bigger and bigger market to keep our eyes on, whether you’re looking to pivot into a profitable market, looking for employment, or finding leads for your business. As an RGV native, it’s hard not to notice the construction happening left and right as our once-small community rushes to modernize and take advantage of our unique geo locality.</p>

<p>I would be lying if I said I didn’t want a piece of the pie before the party got too busy. However, more than just financial motivations, I want to help the place I grew up grow to be the powerhouse of the south, and maybe one day, we can reach the levels of bigger cities like Austin or Houston. Elon Musk and SpaceX inspired many to begin the race to the top, and I want to help our construction and manufacturing communities get there. I don’t want us to be left out of the game.</p>

<h3 id="defining-the-hierarchy">Defining the hierarchy</h3>
<p>Before we tackle our problem, it’s important to learn a bit more about how the industry works - specifically, the relationship between owners, general contractors, and subcontractors.</p>
<ul>
  <li>Owners are those who fund the big project, like a new hospital, bank, power plant, sports facility, etc.</li>
  <li>General contractors (GCs) are a rung below them and are brought onto the project to manage it all. GCs <strong>subcontract</strong> out specific pieces of work, like electrical or plumbing, to specialized trade companies - <strong>subcontractors</strong>.</li>
  <li>Subcontractors (subs) are businesses that usually specialize in a trade, like roofing, tiling, welding, electrical, etc. They are hired by the GC to complete a specific scope of work.</li>
</ul>

<h3 id="deciding-who-gets-subcontracts">Deciding who gets subcontracts</h3>
<p>The GC and owners decide who gets subcontracts. Because liability and risk fall upon the shoulders of the aforementioned stakeholders, they set strict rules as to who is able to receive subcontracts. This is where <strong>compliance checklists come in</strong>. Owners and GCs outsource the compliance vetting to third-party compliance platforms like ISNetworld, Avetta, or Veriforce. These platforms act as keepers to the gate.</p>
<ul>
  <li>If the sub is in good standing and fulfills all the points on the list, they pass!</li>
  <li>Otherwise, they’ll get kicked off the job site or their bid will be blocked. Womp womp!</li>
</ul>

<p>To be clear, again, these checklists come from the third-party compliance platforms.</p>

<h4 id="a-note-worth-mentioning">A note worth mentioning</h4>
<p>For small residential jobs, you can probably get away with not having to go through all these loops. However, for bigger contracts, which so happens to be the title of this post, YES. You will absolutely need to go through some sort of vetting process to be able to bid and participate on bigger pieces of pie.</p>

<h3 id="the-idea-and-some-questions">The idea and some questions</h3>
<p>Given the context at hand, we can begin to imagine a gap between the checklists that third-party platforms provide and the subcontractor. This gap is: who will take charge of dealing with the checklists? The owner of the small business? What if they are busy with other operations? Do small businesses have dedicated risk management departments? How about all the confusing terminology and legal jargon included in these contracts; will small business owners be able to keep up? Can small businesses outsource and pay high prices for consultants?</p>

<h3 id="problem-statement">Problem statement</h3>

<p>Small and mid-sized RGV subcontractors and specialty trades, like electrical, mechanical, HVAC, civil, and insulation, can’t bid on GC or industrial work unless they’re <strong>prequalified</strong> on platforms like ISNetworld, Avetta, or Veriforce. Therefore, (let’s pretend) we’ve been tasked to create a system that keeps subcontractor paperwork current, up-to-date, and compliant with industry standards and regulations.</p>

<h4 id="our-solution">Our solution</h4>
<p>We’re going to build a single place for subcontractors to upload their compliance documents, see exactly where they stand against a given platform’s requirements (like the aforementioned ISNetworld, Avetta, Veriforce, etc.), and get warned before anything expires. This solution will reduce the money spent on consultants and save time on keeping track of spreadsheets.</p>

<h4 id="target-users">Target users</h4>
<p>Our primary target users are small trade contractors (electrical, mechanical, HVAC, insulation, civil) in the 5-50 employee range in our region (South Texas). We expect our users to be making $500k-$10M/year in revenue and looking or already bidding on GC or industrial work. We want to help owners or office managers by taking compliance paperwork off their hands. This will allow these stakeholders to focus their efforts elsewhere and offload the cognitive overhead of keeping track of compliance to our system.</p>

<h4 id="user-stories">User stories</h4>
<ol>
  <li>As a sub(contractor), I upload my <a href="https://www.thehartford.com/business-insurance/certificate-of-insurance-coi">Certificate of Insurance</a> (COI), <a href="https://obis.osha.gov/recordkeeping/RKforms.html">OSHA 300</a> log, and safety program, and the system tells me what’s missing or non-compliant against a specific platform’s checklist (e.g., ISNetworld).</li>
  <li>As a sub, I get an email/SMS alert 30/14/7 days before a COI, license, or certification expires.</li>
  <li>As a sub, I can ask in plain language, “Am I ready to bid on [hiring clients]’s program?” and get a clear yes/no plus a gap list.</li>
  <li>As a sub, if I’m missing a written safety program or similar document, the system drafts a starting template I can review and customize rather than starting from a blank page.</li>
  <li>As the founder, I can onboard a new sub in under 30 minutes and demo value in the first session. <em>(This is for us!)</em></li>
</ol>

<h2 id="mvp">MVP</h2>
<p><a href="https://www.atlassian.com/agile/product-management/minimum-viable-product">A minimum viable product (MVP) is the simplest version of a product that allows teams to validate ideas and gather feedback with minimal effort.</a> MVPs reduce risk, inform future development, and will allow us to test the core features of the application with real users <em>(whom we will get to later! very exciting).</em></p>

<h3 id="functional-requirements">Functional requirements</h3>
<p>We will start with a handful of functional requirements. The requirements are in descending order from most priority to least priority.</p>

<table>
  <thead>
    <tr>
      <th>#</th>
      <th>Requirement</th>
      <th>Priority</th>
    </tr>
  </thead>
  <tbody>
    <tr>
      <td>1</td>
      <td>Document uploads (PDFs or images) for COI, licenses, OSHA logs, safety programs.</td>
      <td>P0</td>
    </tr>
    <tr>
      <td>2</td>
      <td>Automated field extraction (Textract) for policy numbers, expiration dates, coverage limits, license numbers</td>
      <td>P0</td>
    </tr>
    <tr>
      <td>3</td>
      <td>Requirement-matching engine. We need to be able to compare extracted data against one hiring-platform’s checklist (start with ISNetworld only)</td>
      <td>P0</td>
    </tr>
    <tr>
      <td>4</td>
      <td>Gap reporting, or a clear list of what’s missing, expired, or insufficient</td>
      <td>P0</td>
    </tr>
    <tr>
      <td>5</td>
      <td>Expiration alerts (email, SMS, all the time)</td>
      <td>P0</td>
    </tr>
    <tr>
      <td>6</td>
      <td>Conversational Q&amp;A chat interface</td>
      <td>P1</td>
    </tr>
    <tr>
      <td>7</td>
      <td>Safety-program draft generation from a template or from a sub’s own data</td>
      <td>P1</td>
    </tr>
    <tr>
      <td>8</td>
      <td>Multi-platform support (Avetta, Veriforce)</td>
      <td>P2</td>
    </tr>
    <tr>
      <td>9</td>
      <td>GC-side view to vet a sub’s compliance status (like a viewer mode)</td>
      <td>P2</td>
    </tr>
    <tr>
      <td>10</td>
      <td>Direct submission/auto-fill to ISNetworld/Avetta/Veriforce</td>
      <td>P2</td>
    </tr>
  </tbody>
</table>

<h3 id="the-plan">The plan</h3>
<p>Using our user stories and highest priority requirements as a base, we can begin to identify some of the key services we’ll need to make this project work:</p>

<h4 id="1-uploading-documents--storage">1. Uploading documents &amp; storage</h4>
<p>We’ll use S3 for document storage, at rest and in transit (S3 &amp; SSE-KMS + TLS 1.3 via HTTPS/API Gateway), and Aurora Postgres as our relational database.</p>

<h4 id="2-field-extraction">2. Field extraction</h4>
<p>We need to extract fields, so we’ll use a ML model for that (Textract).</p>
<ul>
  <li>Specifically, we’ll use Textract’s Queries API or Analyze Document (Forms/Expense API)</li>
</ul>

<h4 id="3-document-conversions">3. Document conversions</h4>
<p>To compare documents values against hiring client checklists (like the aforementioned ISNetworld compliance rules), we can send the raw JSON from Textract into a normalization LLM call. Then, once the data is normalized, we can do math against our uploaded (now normalized) documents and the checklists (which will also be in JSON format). Finally, we’ll have an explainer LLM call to explain the gaps to our user.</p>

<p>When a sub uploads a PDF (to S3), an S3 Event Notification will kick off an AWS Step Functions workflow that orchestrates Textract extraction → the normalization LLM call → the compliance comparison logic, in sequence.</p>

<h5 id="explainer-llm">Explainer LLM</h5>
<p>When users manually upload documents and click a “Compare now” button, the explainer will run. Users should also have the option to upload all their documents at once to some sort of storage repository and have the option to run Textract on all, some, or none automatically/on upload.</p>

<p>In summary, the explainer runs on demand when a sub opens their gap report or hits some button. These design choices are up for debate, and once we get real users in front of the app, we can see where UI/UX can be improved.</p>

<h4 id="4-notification-system">4. Notification system</h4>
<p>We’ll use Amazon EventBridge Scheduler to run cron jobs that query Aurora for upcoming expiration dates and publishes alerts via Amazon SNS/SES. This way, we can fulfill the requirement of getting the 30/14/7 day remaining notificaitons.</p>

<h4 id="5-user-chat-interface">5. User chat interface</h4>
<p>We’ll build a chat UI with Amplify backed by an API gateway and Lambda. Lambda will call Bedrock, and that will start the agentsth4e  off pulling context from our stores.</p>

<h3 id="other-features">Other features</h3>
<h4 id="6-authentication--multi-tenancy">6. Authentication &amp; multi-tenancy.</h4>
<p>We’ll use Cognito for auth/identity. To isolate our users from each other, we’ll probably need to use something like S3 prefix-per-tenant with IAM. SSE-KMS + TLS will only cover data at rest and in transit but won’t deliver on preventing data leakage.</p>

<p>And we’ll stop at there for now. The goal for the project right now is just to have a working demo.</p>

<p>I’ll build the MVP in 4 steps:</p>

<ol>
  <li>Storage and database setup</li>
  <li>Textract + normalization pipeline</li>
  <li>Automated expiration cron jobs</li>
  <li>Chat interface</li>
</ol>

<p>Let’s begin!</p>

<hr />

<h2 id="building-in-aws">Building in AWS</h2>]]></content><author><name>Damian Villarreal</name></author><category term="ongoing" /><category term="project" /><category term="aws" /><category term="architecture" /><summary type="html"><![CDATA[Introduction]]></summary><media:thumbnail xmlns:media="http://search.yahoo.com/mrss/" url="https://damianvillarreal.com/assets/subcontractors.jpg" /><media:content medium="image" url="https://damianvillarreal.com/assets/subcontractors.jpg" xmlns:media="http://search.yahoo.com/mrss/" /></entry><entry><title type="html">Domain-Adaptive Pre-Training: Tailoring LLMs for Specialized Applications</title><link href="https://damianvillarreal.com/blog/2026/03/28/domain-adaptive-pre-training-tailoring-llms-for-specialized-applications/" rel="alternate" type="text/html" title="Domain-Adaptive Pre-Training: Tailoring LLMs for Specialized Applications" /><published>2026-03-28T00:00:00+00:00</published><updated>2026-03-28T00:00:00+00:00</updated><id>https://damianvillarreal.com/blog/2026/03/28/domain-adaptive-pre-training-tailoring-llms-for-specialized-applications</id><content type="html" xml:base="https://damianvillarreal.com/blog/2026/03/28/domain-adaptive-pre-training-tailoring-llms-for-specialized-applications/"><![CDATA[<p>This post is a review of what I learned in NVIDIA’s DAPT workshop, along with some notes and code. My university gave me access to NVIDIA’s hands-on workshop catalog for free. The workshop is closely aligned with <strong>NVIDIA’s NeMo Curator ecosystem</strong> — the lab uses NeMo Curator to ingest, clean, deduplicate, and filter domain-specific data before applying <strong>DAPT</strong>.</p>

<p>These notes are mostly for myself to look back on, and they also document my journey into AI. If you decide to read this, I hope you enjoy!</p>

<p><a href="https://marutitech.com/domain-adaptive-pretraining-llms/">Domain-Adaptive Pre-Training (DAPT)</a> is the process of further training pre-trained general LLMs on domain-specific data. For example, we might train an LLM on curated cybersecurity data to make it better at answering cyber-specific questions.</p>

<p>Dependencies for the notebook:</p>

<div class="language-bash highlighter-rouge"><div class="highlight"><pre class="highlight"><code>apt update
pip <span class="nb">install</span> <span class="s2">"numpy&lt;2"</span> <span class="nt">--break-system-packages</span>
pip <span class="nb">install </span>datasets sentencepiece jsonlines tokenizers transformers torch ftfy matplotlib
pip <span class="nb">install </span><span class="nv">protobuf</span><span class="o">==</span>3.20.1
pip <span class="nb">install</span> <span class="s2">"huggingface_hub==0.24.6"</span> <span class="nt">--break-system-packages</span>
</code></pre></div></div>

<h2 id="1-data-curation">1. Data Curation</h2>

<p>The tutorial follows these steps:</p>

<ol>
  <li>Install requirements and import libraries</li>
  <li>Download data from online sources (GitHub repos, wiki URLs, arXiv PDFs), extract metadata, and convert to <strong>JSONL</strong></li>
  <li>Load the dataset</li>
  <li>Examine file types and sizes (optional)</li>
  <li>Run the data curation pipeline with <strong>NeMo Curator</strong>
    <ul>
      <li>File type identification and separation</li>
      <li>Document-level exact deduplication</li>
      <li>Heuristic-based quality filtering (line count, word count, top N-grams, etc.)</li>
      <li>Fix <strong>Unicode</strong> errors via <code class="language-plaintext highlighter-rouge">ftfy</code></li>
      <li><strong>PII redaction</strong></li>
      <li><strong>GPU-accelerated fuzzy and semantic deduplication</strong></li>
    </ul>
  </li>
  <li>Save the filtered and curated data</li>
  <li>Blend datasets and shuffle</li>
</ol>

<p>I used NeMo Curator, NVIDIA’s open-source library for scalable data curation, built on top of Dask for distributed computing.</p>

<blockquote>
  <p><strong>Important</strong>: Dask parallelizes the pipeline across multiple workers, so instead of processing one document at a time, you can process partitions of documents simultaneously.</p>
</blockquote>

<h3 id="troubleshooting">Troubleshooting</h3>

<p>When running the non-demo version of the DAPT Curation notebook, I encountered numerous issues, mostly due to outdated code. I fixed as many problems as possible so we could observe the full workflow. The demo skips <strong>blending/shuffling</strong> and does not perform <strong>PII redaction</strong> or deduplication.</p>

<p><strong>Common issues:</strong></p>

<ul>
  <li><code class="language-plaintext highlighter-rouge">NumPy</code> compatibility: modules compiled with NumPy 1.x may fail on NumPy 2.2.6. Pin it:</li>
</ul>

<div class="language-bash highlighter-rouge"><div class="highlight"><pre class="highlight"><code>pip <span class="nb">install</span> <span class="s2">"numpy&lt;2"</span> <span class="nt">--break-system-packages</span>
</code></pre></div></div>

<ul>
  <li>Rate limits from arXiv when downloading many files — add delays and reduce concurrency.</li>
  <li>Wikipedia returns 403 unless a <code class="language-plaintext highlighter-rouge">User-Agent</code> header is included:</li>
</ul>

<div class="language-python highlighter-rouge"><div class="highlight"><pre class="highlight"><code><span class="n">url</span> <span class="o">=</span> <span class="s">'https://en.wikipedia.org/wiki/PowerPC'</span>
<span class="n">response</span> <span class="o">=</span> <span class="n">requests</span><span class="p">.</span><span class="n">get</span><span class="p">(</span><span class="n">url</span><span class="p">,</span> <span class="n">headers</span><span class="o">=</span><span class="p">{</span><span class="s">'User-Agent'</span><span class="p">:</span> <span class="s">'Mozilla/5.0'</span><span class="p">})</span>
</code></pre></div></div>

<p>The workshop used 8 Dask workers to fetch articles concurrently — this can overwhelm your machine while loading spaCy models. I reduced workers to two for stability.</p>

<details>
<summary>Show compatibility patch script</summary>

```python
cat &gt; /tmp/fix_all.py &lt;&lt; 'ENDOFSCRIPT'
# DAPT Workshop - Comprehensive Fix Script
# Fixes compatibility issues in dapt-curation/docbuilder.py
# and NeMo-Curator's doc_builder.py

import sys

TARGET = '/dli/task/01_data_curation/dapt-curation/docbuilder.py'
NEMO   = '/opt/NeMo-Curator/nemo_curator/download/doc_builder.py'

# Fix 1: User-Agent header for Wikipedia
lines = open(TARGET).readlines()
for i, line in enumerate(lines):
    if 'response = requests.get(url)' in line and 'headers' not in line:
        lines[i] = (
            '        headers = {"User-Agent": "Mozilla/5.0 (compatible; DAPTWorkshop/1.0)"}\n'
            '        response = requests.get(url, headers=headers)\n'
        )
        break
open(TARGET, 'w').writelines(lines)

# Fix 2: #firstHeading guard
lines = open(TARGET).readlines()
for i, line in enumerate(lines):
    if 'html.select("#firstHeading")[0].text' in line:
        lines[i] = (
            '        headings = html.select("#firstHeading")\n'
            '        if not headings:\n'
            '            return None\n'
            '        title = headings[0].text\n'
        )
        break
open(TARGET, 'w').writelines(lines)

# Fix 5: NeMo-Curator os.remove(None) guard
content = open(NEMO).read()
if 'if downloaded_file:' not in content:
    old = '    if not keep_raw_download:\n        os.remove(downloaded_file)'
    new = '    if not keep_raw_download:\n        if downloaded_file:\n            os.remove(downloaded_file)'
    open(NEMO, 'w').write(content.replace(old, new, 1))

ENDOFSCRIPT
python3 /tmp/fix_all.py
```

</details>

<h3 id="11-reviewing-the-data-curation-pipeline">1.1 Reviewing the Data Curation Pipeline</h3>

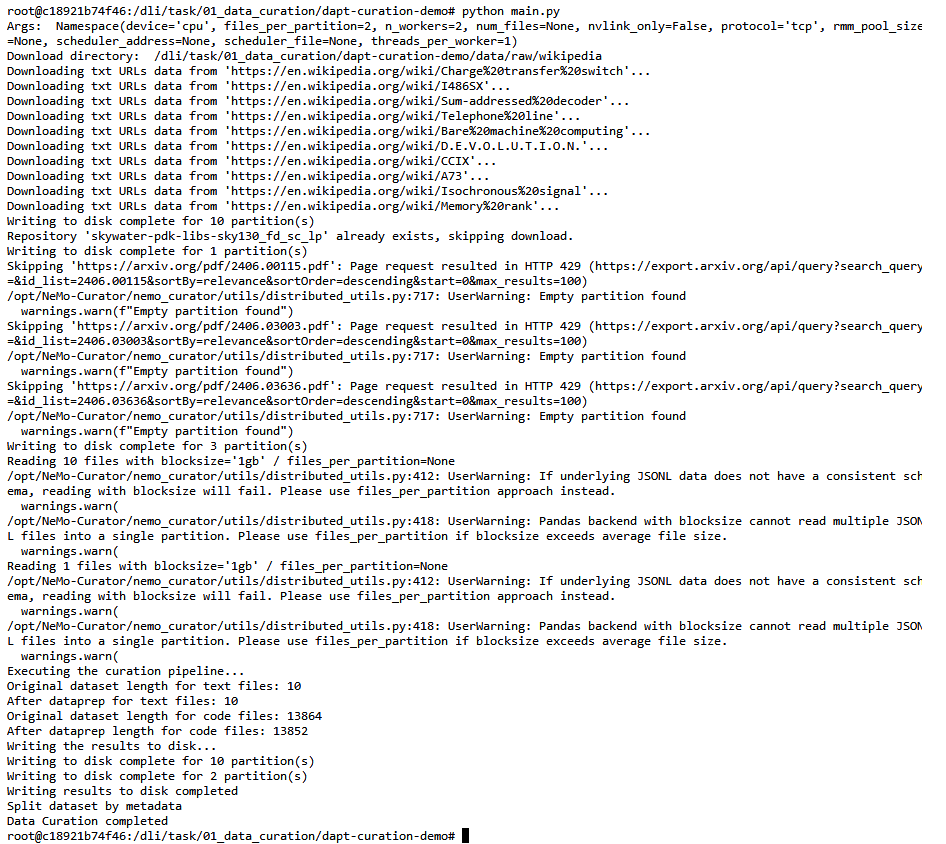
<p>Expected terminal output:</p>

<div class="language-bash highlighter-rouge"><div class="highlight"><pre class="highlight"><code>Original dataset length <span class="k">for </span>text files: 10
After dataprep <span class="k">for </span>text files: 10
Original dataset length <span class="k">for </span>code files: 13864
After dataprep length <span class="k">for </span>code files: 13852
Writing the results to disk...
Data Curation completed
</code></pre></div></div>

<p><img src="/assets/data_curation.png" alt="The finished curation pipeline output" /></p>

<h3 id="12-workflow">1.2 Workflow</h3>

<p>Raw data sources: Wikipedia (text), GitHub repositories (code), arXiv PDFs.</p>

<div class="language-python highlighter-rouge"><div class="highlight"><pre class="highlight"><code><span class="n">wikipedia_dir</span> <span class="o">=</span> <span class="n">download_wikipedia_sources</span><span class="p">(</span>
    <span class="s">"sources/wikipedia_urls.jsonl"</span><span class="p">,</span> <span class="n">limit</span><span class="o">=</span><span class="n">wikipedia_limit</span>
<span class="p">)</span>
<span class="n">github_dir</span> <span class="o">=</span> <span class="n">download_github_sources</span><span class="p">(</span>
    <span class="s">"sources/github_repos.jsonl"</span><span class="p">,</span> <span class="n">limit</span><span class="o">=</span><span class="n">github_limit</span>
<span class="p">)</span>
<span class="n">pdf_dir</span> <span class="o">=</span> <span class="n">download_pdf_sources</span><span class="p">(</span><span class="s">"sources/arxiv_urls.jsonl"</span><span class="p">,</span> <span class="n">limit</span><span class="o">=</span><span class="n">pdf_limit</span><span class="p">)</span>
</code></pre></div></div>

<blockquote>
  <p><strong>Note</strong>: We save content to <code class="language-plaintext highlighter-rouge">.jsonl</code> files (JSON Lines). Each line is a complete JSON object, which makes it easy to read in parallel with Dask — each worker reads its own chunk of lines independently.</p>
</blockquote>

<h4 id="curation-pipeline">Curation Pipeline</h4>

<p>The raw data is processed through the curation pipeline:</p>

<ul>
  <li><strong>Clean and unify formatting</strong> (e.g., Unicode normalization)</li>
  <li><strong>Line-count filtering</strong> to remove too-short documents</li>
  <li><strong>Exact deduplication</strong> to remove identical documents</li>
  <li><strong>PII redaction</strong> on code files using spaCy and Presidio recognizers</li>
</ul>

<p>Separate pipelines are defined for text and code:</p>

<div class="language-python highlighter-rouge"><div class="highlight"><pre class="highlight"><code><span class="n">curation_steps_text</span> <span class="o">=</span> <span class="n">Sequential</span><span class="p">([</span>
    <span class="n">clean_and_unify</span><span class="p">,</span>
    <span class="n">ScoreFilter</span><span class="p">(</span><span class="n">TextLineCountFilter</span><span class="p">(),</span> <span class="n">text_field</span><span class="o">=</span><span class="s">"file_type_count"</span><span class="p">,</span> <span class="n">score_type</span><span class="o">=</span><span class="nb">bool</span><span class="p">),</span>
    <span class="n">filter_text</span><span class="p">,</span>
<span class="p">])</span>

<span class="n">curation_steps_code</span> <span class="o">=</span> <span class="n">Sequential</span><span class="p">([</span>
    <span class="n">clean_and_unify</span><span class="p">,</span>
    <span class="n">ScoreFilter</span><span class="p">(</span><span class="n">CodeLineCountFilter</span><span class="p">(),</span> <span class="n">text_field</span><span class="o">=</span><span class="s">"file_type_count"</span><span class="p">,</span> <span class="n">score_type</span><span class="o">=</span><span class="nb">bool</span><span class="p">),</span>
    <span class="n">filter_code</span><span class="p">,</span>
<span class="p">])</span>
</code></pre></div></div>

<p>Then data is split by category so it can be blended at different weights:</p>

<div class="language-python highlighter-rouge"><div class="highlight"><pre class="highlight"><code><span class="n">separated_data_text</span> <span class="o">=</span> <span class="n">separate_by_metadata</span><span class="p">(</span>
    <span class="n">final_dataset_text</span><span class="p">.</span><span class="n">df</span><span class="p">,</span> <span class="n">out_path</span><span class="p">,</span> <span class="s">"category"</span>
<span class="p">).</span><span class="n">compute</span><span class="p">()</span>
<span class="n">separated_data_code</span> <span class="o">=</span> <span class="n">separate_by_metadata</span><span class="p">(</span>
    <span class="n">final_dataset_code</span><span class="p">.</span><span class="n">df</span><span class="p">,</span> <span class="n">out_path</span><span class="p">,</span> <span class="s">"category"</span>
<span class="p">).</span><span class="n">compute</span><span class="p">()</span>
</code></pre></div></div>

<blockquote>
  <p><strong>Important</strong>: The pipeline uses three deduplication techniques: <strong>exact</strong> (removes identical documents), <strong>fuzzy</strong> (near-duplicates via MinHash), and <strong>semantic</strong> (embedding-based similarity).</p>
</blockquote>

<h4 id="blending-and-shuffling">Blending and Shuffling</h4>

<div class="language-python highlighter-rouge"><div class="highlight"><pre class="highlight"><code><span class="k">def</span> <span class="nf">blend_and_shuffle</span><span class="p">(</span><span class="n">args</span><span class="p">,</span> <span class="n">dataset_paths</span><span class="p">,</span> <span class="n">dataset_weights</span><span class="p">,</span> <span class="n">target_size</span><span class="p">):</span>
    <span class="n">datasets</span> <span class="o">=</span> <span class="p">[</span><span class="n">DocumentDataset</span><span class="p">.</span><span class="n">read_json</span><span class="p">(</span><span class="n">path</span><span class="p">)</span> <span class="k">for</span> <span class="n">path</span> <span class="ow">in</span> <span class="n">dataset_paths</span><span class="p">]</span>
    <span class="n">blended_dataset</span> <span class="o">=</span> <span class="n">nc</span><span class="p">.</span><span class="n">blend_datasets</span><span class="p">(</span><span class="n">target_size</span><span class="p">,</span> <span class="n">datasets</span><span class="p">,</span> <span class="n">dataset_weights</span><span class="p">)</span>
    <span class="n">blended_dataset</span> <span class="o">=</span> <span class="n">nc</span><span class="p">.</span><span class="n">Shuffle</span><span class="p">(</span><span class="n">seed</span><span class="o">=</span><span class="mi">42</span><span class="p">)(</span><span class="n">blended_dataset</span><span class="p">)</span>
    <span class="n">blended_dataset</span><span class="p">.</span><span class="n">to_json</span><span class="p">(</span><span class="n">output_path</span><span class="p">)</span>
</code></pre></div></div>

<p>Blending weights for chip-design-focused pretraining:</p>

<div class="language-python highlighter-rouge"><div class="highlight"><pre class="highlight"><code><span class="n">dataset_paths</span> <span class="o">=</span> <span class="p">[</span><span class="s">"CPP"</span><span class="p">,</span> <span class="s">"VerilogVHDL"</span><span class="p">,</span> <span class="s">"text"</span><span class="p">,</span> <span class="s">"Python"</span><span class="p">]</span>
<span class="n">dataset_weights</span> <span class="o">=</span> <span class="p">[</span><span class="mf">1.0</span><span class="p">,</span> <span class="mf">4.0</span><span class="p">,</span> <span class="mf">4.0</span><span class="p">,</span> <span class="mf">1.0</span><span class="p">]</span>
<span class="n">target_size</span> <span class="o">=</span> <span class="mi">20</span>
</code></pre></div></div>

<p>This oversamples Verilog/VHDL and text. Shuffling after blending is important:</p>

<blockquote>
  <p><strong>Note</strong>: Without shuffling, the dataset is grouped by source and can cause <strong>catastrophic forgetting</strong>. Interleaving source types in training batches stabilizes learning — each gradient update sees a mix, so no single domain dominates and overwrites another.</p>
</blockquote>

<h4 id="results">Results</h4>

<p>All 10 text documents passed quality checks. For code, 13,864 went in and 13,852 came out — 12 dropped as duplicates or too short. Curated data is written to <code class="language-plaintext highlighter-rouge">/data/curated/</code> and split by category.</p>

<h2 id="2-custom-tokenization">2. Custom Tokenization</h2>

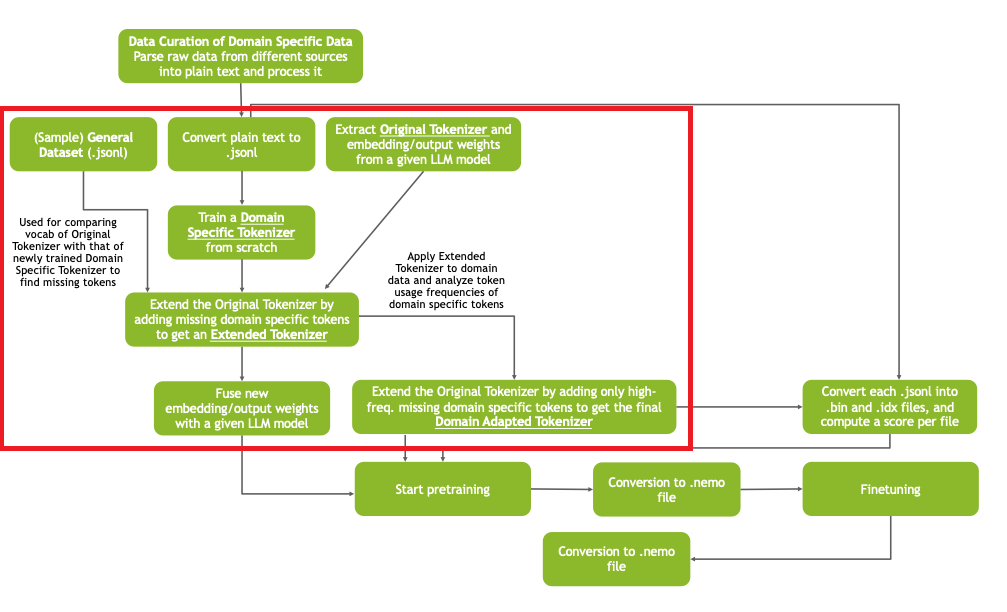
<p><img src="/assets/tokenization-diagram.png" alt="Tokenization diagram" /></p>

<h3 id="goal">Goal</h3>

<p>Given a tokenizer pretrained on general-purpose datasets, we want to adapt it to a specific domain (chip design in the workshop). Goals:</p>

<ul>
  <li>Improve tokenization efficiency on domain-specific data</li>
  <li>Maintain efficiency on general-purpose datasets</li>
  <li>Minimize effort for retraining/fine-tuning</li>
</ul>

<p>Since we don’t have access to the full general-purpose pretraining data, we preserve the existing token mapping and strictly extend it with new domain tokens.</p>

<blockquote>
  <p><strong>Note</strong>: <strong>Tokens</strong> are the fundamental building blocks of data that LLMs read and generate. Custom tokenization adds specialized domain jargon to the tokenizer’s master dictionary.</p>
</blockquote>

<h3 id="approach">Approach</h3>

<p>Train a <strong>Domain Specific Tokenizer</strong> from scratch on domain data, compare its vocabulary to the <strong>Original Tokenizer</strong>, and add the missing domain-specific tokens. This produces the final <strong>Domain Adapted Tokenizer</strong>.</p>

<h3 id="tradeoff">Tradeoff</h3>

<p>Adding too many domain tokens improves domain efficiency but slows DAPT convergence (disrupts general-purpose performance). Adding too few lacks coverage. To balance: identify the most frequently occurring missing tokens using a frequency threshold and only add those.</p>

<h3 id="21-train-a-tokenizer-from-scratch">2.1 Train a tokenizer from scratch</h3>

<div class="language-python highlighter-rouge"><div class="highlight"><pre class="highlight"><code><span class="n">data_root</span> <span class="o">=</span> <span class="s">"./curated_sample_data/curated_data/"</span>
<span class="n">save_root</span> <span class="o">=</span> <span class="s">"./models/tokenizer/llama2/"</span>
<span class="n">vocab_size</span> <span class="o">=</span> <span class="mi">20000</span>  <span class="c1"># ~67% of Llama 2's 32k vocab
</span>
<span class="n">tokenizer</span> <span class="o">=</span> <span class="n">AutoTokenizer</span><span class="p">.</span><span class="n">from_pretrained</span><span class="p">(</span><span class="s">"facebook/opt-350m"</span><span class="p">)</span>
<span class="n">tokenizer</span> <span class="o">=</span> <span class="n">tokenizer</span><span class="p">.</span><span class="n">train_new_from_iterator</span><span class="p">(</span>
    <span class="n">data_iterator</span><span class="p">(</span><span class="n">data_root</span><span class="p">,</span> <span class="n">keys</span><span class="p">,</span> <span class="n">batch_size</span><span class="p">),</span>
    <span class="n">vocab_size</span><span class="o">=</span><span class="n">vocab_size</span>
<span class="p">)</span>
<span class="n">tokenizer</span><span class="p">.</span><span class="n">save_pretrained</span><span class="p">(</span><span class="n">save_root</span><span class="p">)</span>
</code></pre></div></div>

<p>Key hyperparameters:</p>
<ul>
  <li><strong>Batch size</strong>: depends on available memory and dataset size</li>
  <li><strong>Vocab size</strong>: 30–70% of original vocab size; technical domains need larger vocabularies</li>
</ul>

<h3 id="22-identify-new-domain-tokens">2.2 Identify new domain tokens</h3>

<p>Compare the new tokenizer’s vocabulary to the original and extend:</p>

<div class="language-python highlighter-rouge"><div class="highlight"><pre class="highlight"><code><span class="n">extend_tokenizer</span><span class="p">(</span><span class="n">vocab_size</span><span class="p">,</span> <span class="n">split</span><span class="p">,</span> <span class="n">model_type</span><span class="p">)</span>
</code></pre></div></div>

<h3 id="23-token-usage-frequency-analysis">2.3 Token Usage Frequency Analysis</h3>

<p>Apply the extended tokenizer to domain data, analyze usage frequencies, and select top-K tokens above a threshold:</p>

<div class="language-python highlighter-rouge"><div class="highlight"><pre class="highlight"><code><span class="n">freq_threshold</span> <span class="o">=</span> <span class="mf">0.98</span>  <span class="c1"># keep tokens accounting for top 98% of usage
</span>
<span class="n">analyze_token_usage</span><span class="p">(</span><span class="n">data_root</span><span class="p">,</span> <span class="n">extended_tokenizer_path</span><span class="p">,</span> <span class="n">batch_size</span><span class="p">,</span> <span class="n">keys</span><span class="p">,</span> <span class="n">token_usage_path</span><span class="p">)</span>
<span class="n">get_high_freq_tokens</span><span class="p">(</span><span class="n">token_usage_path</span><span class="p">,</span> <span class="n">high_freq_tokens_path</span><span class="p">,</span> <span class="n">freq_threshold</span><span class="p">)</span>
</code></pre></div></div>

<blockquote>
  <p><strong>Note</strong>: <code class="language-plaintext highlighter-rouge">freq_threshold</code> balances the tradeoff: lower (0.95–0.97) for highly specialized domains, higher (0.98–0.99) for domains closer to general-purpose data.</p>
</blockquote>

<h3 id="24-initialize-embeddings-of-new-tokens">2.4 Initialize embeddings of new tokens</h3>

<p>New token embeddings are initialized as the average of their sub-token embeddings:</p>

<div class="language-python highlighter-rouge"><div class="highlight"><pre class="highlight"><code><span class="n">extend_tokenizer_high_freq_tokens</span><span class="p">(</span>
    <span class="n">data_root</span><span class="p">,</span> <span class="n">ori_tokenizer_path</span><span class="p">,</span> <span class="n">new_tokens</span><span class="p">,</span>
    <span class="n">new_vocab_path</span><span class="p">,</span> <span class="n">domain_adapter_tokenizer_path</span><span class="p">,</span>
    <span class="n">old_ebd_path</span><span class="p">,</span> <span class="n">new_ebd_path</span><span class="p">,</span> <span class="n">split</span>
<span class="p">)</span>
</code></pre></div></div>

<h3 id="25-merge-with-the-original-embedding-table">2.5 Merge with the original embedding table</h3>

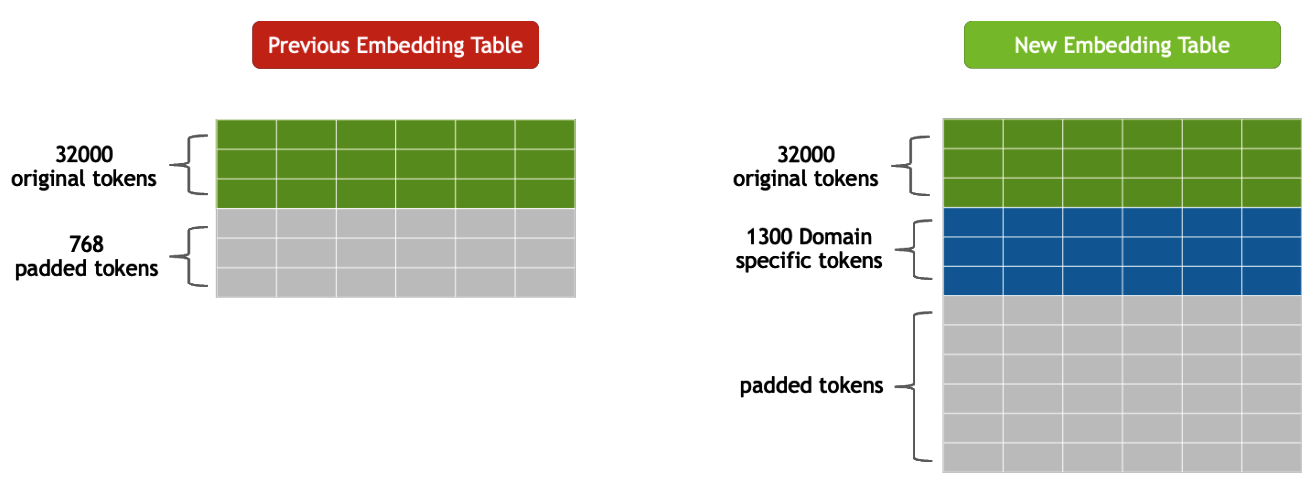
<p><img src="/assets/embedding_tables.png" alt="Embedding tables" /></p>

<p>Before: 3,200 original tokens + 768 padded tokens. After: +1,300 domain-specific tokens added while retaining the original 3,200. Column count (embedding dimensionality) stays the same.</p>

<div class="language-python highlighter-rouge"><div class="highlight"><pre class="highlight"><code><span class="n">merge_embed</span><span class="p">(</span><span class="n">old_ebd_path</span><span class="p">,</span> <span class="n">new_ebd_path</span><span class="p">,</span> <span class="n">save_path</span><span class="p">)</span>
</code></pre></div></div>

<h2 id="3-domain-adaptive-pretraining-dapt">3. Domain-Adaptive Pretraining (DAPT)</h2>

<h3 id="goal-1">Goal</h3>

<p>Take a foundational model (<strong>llama-2-7B</strong>) pretrained on a broad corpus and further pretrain it on a specific domain (chip design). Goals:</p>

<ul>
  <li>Improve performance and accuracy on domain-specific tasks</li>
  <li>Ensure the model retains general language capabilities</li>
  <li>Minimize pretraining time by leveraging existing knowledge</li>
</ul>

<p><img src="/assets/dapt2.png" alt="DAPT diagram" /></p>

<blockquote>
  <p><strong>Important</strong>: The main objective of DAPT is to further pre-train a general-purpose model on domain-specific data to improve its understanding of that domain’s language and context.</p>
</blockquote>

<p>A few important ideas:</p>

<ol>
  <li><strong>Tensor parallelism</strong> — shards weight matrices across GPUs, allowing very large models to fit in GPU memory</li>
  <li><strong>Pipeline parallelism</strong> — splits the model by layers across GPUs (e.g., GPU 0 runs layers 1–8, GPU 1 runs layers 9–16)</li>
  <li><strong>Data parallelism</strong> — shards input data into batches, each trained on the full model</li>
  <li><strong>Selective activation recomputation</strong> — saves only essential activations and recomputes the rest</li>
  <li><strong>Distributed checkpointing</strong> — saves/restores state even if the parallelism strategy changes between runs</li>
</ol>

<blockquote>
  <p><strong>Note</strong>: <strong>Weights</strong> are the learnable parameters of a neural network. Training is the process of finding weights that minimize the loss function — gradient descent computes how much each weight contributed to the error, then nudges it in the direction that reduces that error. In practice, weights are stored as matrices (2D tensors), hence <em>weight matrix</em>.</p>
</blockquote>

<div class="language-python highlighter-rouge"><div class="highlight"><pre class="highlight"><code><span class="k">def</span> <span class="nf">configure_recipe</span><span class="p">(</span><span class="n">nodes</span><span class="o">=</span><span class="mi">1</span><span class="p">,</span> <span class="n">gpus_per_node</span><span class="o">=</span><span class="mi">1</span><span class="p">):</span>
    <span class="n">recipe</span> <span class="o">=</span> <span class="n">llm</span><span class="p">.</span><span class="n">llama2_7b</span><span class="p">.</span><span class="n">pretrain_recipe</span><span class="p">(</span>
        <span class="n">name</span><span class="o">=</span><span class="s">"llama2_7b_dapt"</span><span class="p">,</span>
        <span class="n">num_nodes</span><span class="o">=</span><span class="n">nodes</span><span class="p">,</span>
        <span class="n">num_gpus_per_node</span><span class="o">=</span><span class="n">gpus_per_node</span><span class="p">,</span>
    <span class="p">)</span>
    <span class="n">strategy</span> <span class="o">=</span> <span class="n">recipe</span><span class="p">.</span><span class="n">trainer</span><span class="p">.</span><span class="n">strategy</span>
    <span class="n">strategy</span><span class="p">.</span><span class="n">context_parallel_size</span> <span class="o">=</span> <span class="mi">1</span>
    <span class="n">strategy</span><span class="p">.</span><span class="n">tensor_model_parallel_size</span> <span class="o">=</span> <span class="mi">1</span>
    <span class="n">recipe</span><span class="p">.</span><span class="n">trainer</span><span class="p">.</span><span class="n">val_check_interval</span> <span class="o">=</span> <span class="mi">10</span>
    <span class="k">return</span> <span class="n">recipe</span>
</code></pre></div></div>

<p>Training configuration:</p>

<div class="language-python highlighter-rouge"><div class="highlight"><pre class="highlight"><code><span class="n">recipe</span><span class="p">.</span><span class="n">trainer</span><span class="p">.</span><span class="n">strategy</span><span class="p">.</span><span class="n">tensor_model_parallel_size</span> <span class="o">=</span> <span class="mi">2</span>
<span class="n">recipe</span><span class="p">.</span><span class="n">trainer</span><span class="p">.</span><span class="n">max_steps</span> <span class="o">=</span> <span class="mi">20</span>
<span class="n">recipe</span><span class="p">.</span><span class="n">trainer</span><span class="p">.</span><span class="n">max_epochs</span> <span class="o">=</span> <span class="mi">1</span>
<span class="n">recipe</span><span class="p">.</span><span class="n">optim</span><span class="p">.</span><span class="n">config</span><span class="p">.</span><span class="n">lr</span> <span class="o">=</span> <span class="mf">1e-5</span>
<span class="n">recipe</span><span class="p">.</span><span class="n">optim</span><span class="p">.</span><span class="n">lr_scheduler</span><span class="p">.</span><span class="n">min_lr</span> <span class="o">=</span> <span class="mf">1e-6</span>
</code></pre></div></div>

<h3 id="31-evaluation">3.1 Evaluation</h3>

<p><strong>Quantitative</strong>: perplexity, ROUGE, BLEU, cosine similarity, LLM-as-a-judge scoring, adversarial failure rates.</p>

<p><strong>Qualitative</strong>: human eval on relevance/coherence/factuality, LLM-as-a-judge for subjective scoring.</p>

<p>Use general-purpose benchmarks to confirm the model retains prior knowledge, task-specific benchmarks for the new domain, and adversarial benchmarks to test robustness.</p>

<h2 id="4-supervised-fine-tuning-sft">4. Supervised Fine-Tuning (SFT)</h2>

<p><img src="/assets/Lifecycle-generative-AI-application.png" alt="Model customization lifecycle" /></p>

<p><a href="https://docs.nvidia.com/nemo-framework/user-guide/25.04/automodel/sft.html"><strong>Supervised fine-tuning (SFT)</strong></a> enables a pretrained model to specialize in a given domain by training it on labeled data (input-output pairs), refining its responses while preserving broad pretrained knowledge. Also called “instruction tuning.”</p>

<div class="language-python highlighter-rouge"><div class="highlight"><pre class="highlight"><code><span class="k">def</span> <span class="nf">configure_finetuning_recipe</span><span class="p">():</span>
    <span class="k">return</span> <span class="n">run</span><span class="p">.</span><span class="n">Partial</span><span class="p">(</span>
        <span class="n">llm</span><span class="p">.</span><span class="n">finetune</span><span class="p">,</span>
        <span class="n">model</span><span class="o">=</span><span class="n">llama2_7b</span><span class="p">(),</span>
        <span class="n">trainer</span><span class="o">=</span><span class="n">trainer</span><span class="p">(),</span>
        <span class="n">data</span><span class="o">=</span><span class="n">verilog</span><span class="p">(),</span>
        <span class="n">log</span><span class="o">=</span><span class="n">logger</span><span class="p">(),</span>
        <span class="n">optim</span><span class="o">=</span><span class="n">adam_with_cosine_annealing</span><span class="p">(),</span>
        <span class="n">resume</span><span class="o">=</span><span class="n">resume</span><span class="p">(),</span>
    <span class="p">)</span>

<span class="n">run</span><span class="p">.</span><span class="n">run</span><span class="p">(</span><span class="n">configure_finetuning_recipe</span><span class="p">(),</span> <span class="n">executor</span><span class="o">=</span><span class="n">local_executor_torchrun</span><span class="p">())</span>
</code></pre></div></div>

<p>Key points when fine-tuning:</p>
<ul>
  <li>Start from a DAPT or instruction fine-tuned model</li>
  <li>Use the domain-adapted tokenizer</li>
  <li>Use a smaller learning rate than DAPT (higher risk of catastrophic forgetting on small, high-quality SFT data)</li>
  <li>Prevent overfitting via early stopping with cross-validation</li>
</ul>

<p>For evaluation: <strong>RLHF</strong> (accurate but slow, subjectively biased) vs. <strong>LLM-as-a-judge</strong> (fast but biased by training data, sensitive to prompts).</p>

<blockquote>
  <p><strong>Important</strong>: SFT yields better performance when built on top of a DAPT model rather than starting from a generic base model.</p>
</blockquote>

<h2 id="conclusion">Conclusion</h2>

<p>In order:</p>

<ol>
  <li><strong>Data curation</strong> — maximize LLM accuracy for specific tasks via deduplication, PII redaction, and quality filtering.</li>
  <li><strong>Custom tokenization</strong> — train a domain tokenizer from scratch, identify high-frequency missing tokens, and add them to the original tokenizer.</li>
  <li><strong>DAPT</strong> — further pretrain a foundational model (llama-2-7B) on the curated domain corpus.</li>
  <li><strong>SFT</strong> — refine the DAPT model using labeled enterprise data.</li>
</ol>

<p>The ChipNeMo paper that inspired this workshop showed measurable improvements on chip design tasks over the base Llama 2 model. This workshop is a hands-on reproduction of that methodology at smaller scale. If you’re working on a domain-specific LLM problem — whether in cybersecurity, medicine, law, or hardware design — the pipeline here is a solid starting point.</p>

<p>Thanks for reading! Feel free to reach out if you’d like to talk about anything.</p>]]></content><author><name>Damian Villarreal</name></author><category term="ai" /><category term="llm" /><category term="dapt" /><category term="nemo" /><category term="python" /><summary type="html"><![CDATA[This post is a review of what I learned in NVIDIA’s DAPT workshop, along with some notes and code. My university gave me access to NVIDIA’s hands-on workshop catalog for free. The workshop is closely aligned with NVIDIA’s NeMo Curator ecosystem — the lab uses NeMo Curator to ingest, clean, deduplicate, and filter domain-specific data before applying DAPT.]]></summary><media:thumbnail xmlns:media="http://search.yahoo.com/mrss/" url="https://damianvillarreal.com/assets/dapt2.png" /><media:content medium="image" url="https://damianvillarreal.com/assets/dapt2.png" xmlns:media="http://search.yahoo.com/mrss/" /></entry><entry><title type="html">Akira Ransomware Binary Analysis</title><link href="https://damianvillarreal.com/blog/2026/01/19/akira-ransomware-binary-analysis/" rel="alternate" type="text/html" title="Akira Ransomware Binary Analysis" /><published>2026-01-19T00:00:00+00:00</published><updated>2026-01-19T00:00:00+00:00</updated><id>https://damianvillarreal.com/blog/2026/01/19/akira-ransomware-binary-analysis</id><content type="html" xml:base="https://damianvillarreal.com/blog/2026/01/19/akira-ransomware-binary-analysis/"><![CDATA[<p><img src="https://imgsrv.crunchyroll.com/cdn-cgi/image/fit=cover,format=auto,quality=85,width=1920/keyart/GRQWJWPGR-backdrop_wide" alt="Akira poster" /></p>

<p>In this post, I’ll be documenting the first part of my technical analysis of the Akira ransomware variant. I’ll be using <a href="https://github.com/MottaSec/akira-ransomware-reverse">this report</a> as my guide. The report is extremely thorough but not especially beginner-friendly. 
I aim to document how I arrived at similar conclusions and to expand on what we can take away from those findings. Rather than providing a complete or authoritative analysis, my goal is to show the learning process itself.</p>

<p>I also recommend these supplementary materials:</p>

<ul>
  <li><a href="https://areteir.com/resources/malware-spotlight-akira-ransomware">Arete Akira Technical Analysis</a></li>
  <li><a href="https://www.cisa.gov/news-events/cybersecurity-advisories/aa24-109a">CISA Akira Report</a></li>
</ul>

<p>Reverse engineering plays an important role in digital forensics and vulnerability research. How can we dismantle malware, identify its weaknesses, and use that knowledge to develop effective defenses?</p>

<h2 id="what-is-akira">What is Akira?</h2>

<p>According to <a href="https://www.sentinelone.com/anthology/akira/">SentinelOne</a>, Akira ransomware operations were initiated in March 2023. Actors behind Akira practice multi-extortion tactics and host a TOR-based (.onion) website where victims are listed along with stolen data if a ransom demand goes unmet. The group is known for outrageous ransom payments reaching hundreds of millions of dollars.</p>

<p>Akira targets large enterprises across education, financial, manufacturing, real estate, and medical industries.</p>

<h2 id="deliverables">Deliverables</h2>

<ol>
  <li>Become familiar with Ghidra</li>
  <li>Demonstrate preliminary analysis</li>
  <li>Find points of interest</li>
</ol>

<h2 id="setup">Setup</h2>

<p>I’ll be using a REMnux container via Docker on a Windows 11 machine. To run Ghidra from the REMnux Docker container, you’ll need X11 forwarding:</p>

<div class="language-bash highlighter-rouge"><div class="highlight"><pre class="highlight"><code><span class="c"># Linux/macOS</span>
docker run <span class="nt">-it</span> <span class="nt">--rm</span> <span class="se">\</span>
  <span class="nt">-e</span> <span class="nv">DISPLAY</span><span class="o">=</span><span class="nv">$DISPLAY</span> <span class="se">\</span>
  <span class="nt">-v</span> /tmp/.X11-unix:/tmp/.X11-unix <span class="se">\</span>
  <span class="nt">-v</span> <span class="si">$(</span><span class="nb">pwd</span><span class="si">)</span>:/samples <span class="se">\</span>
  remnux/remnux-distro:focal <span class="se">\</span>
  /bin/bash

<span class="c"># Then inside the container</span>
ghidra
</code></pre></div></div>

<p>For Windows with WSL2: install VcXsrv or X410, start the X server, then set <code class="language-plaintext highlighter-rouge">DISPLAY=host.docker.internal:0</code>.</p>

<p>Download the Akira sample from <a href="https://bazaar.abuse.ch/sample/def3fe8d07d5370ac6e105b1a7872c77e193b4b39a6e1cc9cfc815a36e909904/">MalwareBazaar</a>. Once you’ve opened the file in Ghidra, we can get started.</p>

<hr />

<h2 id="1-pe-structure-imports-and-strings">1. PE Structure, Imports, and Strings</h2>

<h3 id="11-pe-structure">1.1 PE Structure</h3>

<p>The Akira sample has a standard PE structure: <code class="language-plaintext highlighter-rouge">.text</code>, <code class="language-plaintext highlighter-rouge">.rdata</code>, <code class="language-plaintext highlighter-rouge">.data</code>, <code class="language-plaintext highlighter-rouge">.pdata</code>, <code class="language-plaintext highlighter-rouge">.rsrc</code>, and <code class="language-plaintext highlighter-rouge">.reloc</code> sections. Use the Memory Map tool in Ghidra to find them.</p>

<p><img src="/assets/memorymap.png" alt="Memory map" /></p>

<ul>
  <li><code class="language-plaintext highlighter-rouge">.text</code> — stores <em>executable</em> code. The largest section; houses the ransomware logic.</li>
  <li><code class="language-plaintext highlighter-rouge">.rdata</code> — <em>read-only</em> data. Stores constant data like strings and, importantly, the RSA public key.</li>
  <li><code class="language-plaintext highlighter-rouge">.data</code> — initialized data. Think <em>global and static variables</em>.</li>
  <li><a href="https://learn.microsoft.com/en-us/windows/win32/debug/pe-format#the-pdata-section"><code class="language-plaintext highlighter-rouge">.pdata</code></a> — the <em>exception table</em>. Contains function entry and exception handling information.</li>
  <li><a href="https://learn.microsoft.com/en-us/windows/win32/debug/pe-format#the-rsrc-section"><code class="language-plaintext highlighter-rouge">.rsrc</code></a> — resource directory tables: icons, strings, menus, images.</li>
  <li><a href="https://0xrick.github.io/win-internals/pe7/"><code class="language-plaintext highlighter-rouge">.reloc</code></a> — the base relocation table.</li>
</ul>

<p>Microsoft has extensive documentation on all of these <a href="https://learn.microsoft.com/en-us/windows/win32/debug/pe-format">here</a>.</p>

<h3 id="12-imports">1.2 Imports</h3>

<p>Imports tell us what Windows APIs the program uses. You can find imports in Ghidra under the Symbols Tree.</p>

<p><img src="/assets/symboltree.png" alt="Symbols tree" /></p>

<p>Notable imports:</p>

<ul>
  <li><code class="language-plaintext highlighter-rouge">shell32.dll</code> — provides <code class="language-plaintext highlighter-rouge">CommandLineToArgvW</code> and <code class="language-plaintext highlighter-rouge">ShellExecuteW</code>. Keep an eye out for PowerShell commands.</li>
  <li><code class="language-plaintext highlighter-rouge">kernel32.dll</code> — the core Windows API. Provides <code class="language-plaintext highlighter-rouge">CreateDirectoryW</code>, <code class="language-plaintext highlighter-rouge">CreateEventW</code>, <code class="language-plaintext highlighter-rouge">CreateFileW</code>, <code class="language-plaintext highlighter-rouge">DeleteFileW</code>, <code class="language-plaintext highlighter-rouge">TerminateProcess</code>, <code class="language-plaintext highlighter-rouge">WriteFile</code>, etc.</li>
</ul>

<p>Interestingly, there are no cryptographic libraries, which means Akira uses its own custom code for key generation.
A custom key generation module might be something we can pick apart and try to find weaknesses in.</p>

<h3 id="13-strings">1.3 Strings</h3>

<p>We can look at the Defined Strings panel to identify a few key strings.</p>

<ul>
  <li><code class="language-plaintext highlighter-rouge">powershell.exe -Command "Get-WmiObject Win32_Shadowcopy | Remove-WmiObject"</code> at <code class="language-plaintext highlighter-rouge">1400ddf10</code> — Akira deletes shadow copies to prevent recovery.</li>
  <li>The ransom note itself at <code class="language-plaintext highlighter-rouge">1400fb0d0</code>:</li>
</ul>

<div class="language-plaintext highlighter-rouge"><div class="highlight"><pre class="highlight"><code>"Hi friends,\r\nWhatever who you are and what your title is, if you're reading this it means
the internal infrastructure of your company is fully or partially dead, all your backups -
virtual, physical - everything that we managed to reach - are completely removed..."
</code></pre></div></div>

<p>The note instructs victims to contact the attacker via their TOR portal with a unique identifier to begin negotiations.</p>

<p><img src="https://www.ibm.com/content/adobe-cms/us/en/think/x-force/spotlight-akira-ransomware-x-force/jcr:content/root/table_of_contents/body-article-8/image_1856054718.coreimg.png/1763568548899/a-spotlight-on-akira-ransomware-from-x-force-incident-response-and-threat-intelligence-1.png" alt="The Akira payment portal" /></p>

<p>We can also find an interesting extension: <code class="language-plaintext highlighter-rouge">.arika</code>. A typo? Maybe. Other reports show <code class="language-plaintext highlighter-rouge">.akira</code>. Threat actors are human too.</p>

<p>Double-clicking on the misspelled extension leads us to a 2,165-line function — Akira’s main encryption engine (<code class="language-plaintext highlighter-rouge">FUN_1400b71a0</code>). We’ll cover this later.</p>

<hr />

<h2 id="2-entry-point-analysis">2. Entry Point Analysis</h2>

<p>We can use <code class="language-plaintext highlighter-rouge">objdump</code> to find the entry point address.</p>

<p><img src="/assets/objdump.png" alt="objdump output" /></p>

<p>This is a Windows 64-bit executable with its entry point at <code class="language-plaintext highlighter-rouge">0x000000014008dd38</code>. Let’s find this in Ghidra.</p>

<p><img src="/assets/entrypoint.png" alt="Entry point" /></p>

<p>The entry point function is called <code class="language-plaintext highlighter-rouge">entry</code>, and contains two calls:</p>

<ol>
  <li><code class="language-plaintext highlighter-rouge">__security_init_cookie()</code></li>
  <li><code class="language-plaintext highlighter-rouge">FUN_14008dbc4()</code></li>
</ol>

<h3 id="21-__security_init_cookie">2.1 <code class="language-plaintext highlighter-rouge">__security_init_cookie()</code></h3>

<p><a href="https://learn.microsoft.com/en-us/cpp/c-runtime-library/reference/security-init-cookie?view=msvc-170">According to Microsoft</a>, the global security cookie is used for buffer overrun protection in code compiled with <code class="language-plaintext highlighter-rouge">/GS</code>. On entry to a protected function, the cookie is placed on the stack; on exit, it’s compared with the global cookie. Any difference indicates a buffer overrun and causes immediate termination.</p>

<h3 id="22-fun_14008dbc4">2.2 <code class="language-plaintext highlighter-rouge">FUN_14008dbc4()</code></h3>

<p><img src="/assets/startup.png" alt="Initialization function" /></p>

<p>This function calls several non-stripped functions that we can Google:</p>

<ul>
  <li><code class="language-plaintext highlighter-rouge">__scrt_initialize_crt</code> — initializes the C runtime library and sets up global variables and data structures used by the CRT.</li>
  <li><code class="language-plaintext highlighter-rouge">__scrt_acquire_startup_lock()</code> — a startup lock; ensures at most one thread initializes at a time.</li>
</ul>

<details>
<summary>Full function code</summary>

```c
ulonglong FUN_14008dbc4(void)
{
  code *pcVar1;
  bool bVar2;
  uint uVar3;
  undefined8 uVar4;
  // ...

  uVar4 = __scrt_initialize_crt(1);
  if ((char)uVar4 == '\0') {
    FUN_14008e30c(7);
  }
  else {
    bVar2 = false;
    uVar4 = __scrt_acquire_startup_lock();
    if (DAT_140100ae8 != 1) {
      if (DAT_140100ae8 == 0) {
        DAT_140100ae8 = 1;
        uVar5 = _initterm_e(&amp;DAT_1400ce728, &amp;DAT_1400ce770);
        if ((int)uVar5 != 0) return 0xff;
        _initterm(&amp;DAT_1400ce558, &amp;DAT_1400ce720);
        DAT_140100ae8 = 2;
      }
      __scrt_release_startup_lock((char)uVar4);
      __scrt_get_show_window_mode();
      _get_narrow_winmain_command_line();
      uVar3 = FUN_14004d2b0();   // &lt;-- main()
      uVar7 = FUN_14008e49c();
      if ((char)uVar7 != '\0') {
        if (!bVar2) _cexit();
        __scrt_uninitialize_crt(true, '\0');
        return (ulonglong)uVar3;
      }
    }
  }
  // ...
}
```

</details>

<p><code class="language-plaintext highlighter-rouge">_initterm_e</code> and <code class="language-plaintext highlighter-rouge">_initterm</code> are C runtime functions that call constructors of global and static objects. Everything so far is startup/initialization code — which should eventually lead us to <code class="language-plaintext highlighter-rouge">main()</code>.</p>

<p>Here’s the execution flow from CRT entry to <code class="language-plaintext highlighter-rouge">main()</code>:</p>

<div class="language-plaintext highlighter-rouge"><div class="highlight"><pre class="highlight"><code>┌─────────────────────┐
│      _start()       │  Program Entry Point
└──────────┬──────────┘
           │ Initialize environment, memory, etc.
┌──────────┴──────────┐
│  Calls constructors │  crti.o (Prologue)
└──────────┬──────────┘
           │ Jump to main()
┌──────────┴──────────┐
│       main()        │
└──────────┬──────────┘
           │ main returns
┌──────────┴──────────┐
│  Calls destructors  │  crtn.o (Epilogue)
└──────────┬──────────┘
           │ exit syscall
      ┌────┴─────┐
      │  OS Exit │
      └──────────┘
</code></pre></div></div>

<p>To find <code class="language-plaintext highlighter-rouge">main()</code>, look for where argument preparation ends. Right before <code class="language-plaintext highlighter-rouge">FUN_14004d2b0()</code> we see:</p>

<div class="language-c highlighter-rouge"><div class="highlight"><pre class="highlight"><code><span class="n">__scrt_get_show_window_mode</span><span class="p">();</span>
<span class="n">_get_narrow_winmain_command_line</span><span class="p">();</span>
<span class="n">uVar3</span> <span class="o">=</span> <span class="n">FUN_14004d2b0</span><span class="p">();</span>  <span class="c1">// main()</span>
</code></pre></div></div>

<p>Those two CRT calls prepare command-line arguments — and immediately after, <code class="language-plaintext highlighter-rouge">__scrt_uninitialize_crt</code> cleans up. <code class="language-plaintext highlighter-rouge">FUN_14004d2b0()</code> is our <code class="language-plaintext highlighter-rouge">main()</code>.</p>

<p><img src="/assets/finding_main.png" alt="Finding main" /></p>

<hr />

<h2 id="3-analyzing-main">3. Analyzing <code class="language-plaintext highlighter-rouge">main()</code></h2>

<p><code class="language-plaintext highlighter-rouge">main()</code> orchestrates the entire ransomware operation — around 1,360 lines. Let’s break it into sections.</p>

<h3 id="31-initialization--logging">3.1 Initialization &amp; Logging</h3>

<p>The first ~233 lines are variable declarations, followed by log creation — formatting timestamps for what appears to be an execution log:</p>

<div class="language-c highlighter-rouge"><div class="highlight"><pre class="highlight"><code><span class="n">local_38</span> <span class="o">=</span> <span class="n">DAT_1400f9368</span> <span class="o">^</span> <span class="p">(</span><span class="n">ulonglong</span><span class="p">)</span><span class="n">auStackY_bb8</span><span class="p">;</span>
<span class="n">_time64</span><span class="p">(</span><span class="o">&amp;</span><span class="n">local_1e0</span><span class="p">);</span>
<span class="n">_Tm</span> <span class="o">=</span> <span class="n">_localtime64</span><span class="p">(</span><span class="o">&amp;</span><span class="n">local_1e0</span><span class="p">);</span>
<span class="n">strftime</span><span class="p">(</span><span class="n">local_88</span><span class="p">,</span> <span class="mh">0x50</span><span class="p">,</span> <span class="s">"Log-%d-%m-%Y-%H-%M-%S"</span><span class="p">,</span> <span class="n">_Tm</span><span class="p">);</span>
</code></pre></div></div>

<p><img src="/assets/variables.png" alt="Variables" /></p>

<h3 id="32-command-line-parsing">3.2 Command Line Parsing</h3>

<div class="language-c highlighter-rouge"><div class="highlight"><pre class="highlight"><code><span class="n">lpCmdLine</span> <span class="o">=</span> <span class="n">GetCommandLineW</span><span class="p">();</span>
<span class="n">hMem</span> <span class="o">=</span> <span class="n">CommandLineToArgvW</span><span class="p">(</span><span class="n">lpCmdLine</span><span class="p">,</span> <span class="n">local_2c0</span><span class="p">);</span>
<span class="k">if</span> <span class="p">(</span><span class="n">hMem</span> <span class="o">==</span> <span class="p">(</span><span class="n">LPWSTR</span> <span class="o">*</span><span class="p">)</span><span class="mh">0x0</span><span class="p">)</span> <span class="p">{</span>
    <span class="n">FUN_1400376b0</span><span class="p">(</span><span class="o">&amp;</span><span class="n">local_b70</span><span class="p">,</span> <span class="s">"Command line to argvW failed!"</span><span class="p">,</span> <span class="mh">0x1d</span><span class="p">);</span>
    <span class="p">...</span>
<span class="p">}</span>
</code></pre></div></div>

<p>The arguments Akira accepts:</p>

<p><img src="/assets/commandlineargs.png" alt="Command line arguments" /></p>

<ul>
  <li><code class="language-plaintext highlighter-rouge">--encryption_path</code></li>
  <li><code class="language-plaintext highlighter-rouge">--encryption_percent</code></li>
  <li><code class="language-plaintext highlighter-rouge">--exclude</code></li>
  <li><code class="language-plaintext highlighter-rouge">--share_file</code></li>
  <li><code class="language-plaintext highlighter-rouge">-dellog</code></li>
  <li><code class="language-plaintext highlighter-rouge">-ep bypass -Command</code></li>
  <li><code class="language-plaintext highlighter-rouge">-localonly</code></li>
</ul>

<h3 id="33-configuration-validation">3.3 Configuration Validation</h3>

<p>If arguments were specified, they’re validated here. Otherwise, Akira falls back to defaults:</p>

<div class="language-c highlighter-rouge"><div class="highlight"><pre class="highlight"><code><span class="c1">// Default encryption percentage is 50%</span>
<span class="k">if</span> <span class="p">(</span><span class="n">encryption_percent_str</span> <span class="o">!=</span> <span class="nb">NULL</span><span class="p">)</span> <span class="p">{</span>
    <span class="n">encryption_percent</span> <span class="o">=</span> <span class="n">wcstol</span><span class="p">(</span><span class="n">encryption_percent_str</span><span class="p">,</span> <span class="o">&amp;</span><span class="n">endptr</span><span class="p">,</span> <span class="mi">10</span><span class="p">);</span>
    <span class="k">if</span> <span class="p">(</span><span class="n">endptr</span> <span class="o">==</span> <span class="n">encryption_percent_str</span><span class="p">)</span> <span class="n">encryption_percent</span> <span class="o">=</span> <span class="mi">50</span><span class="p">;</span>
    <span class="k">if</span> <span class="p">(</span><span class="o">*</span><span class="n">errno_ptr</span> <span class="o">==</span> <span class="n">ERANGE</span><span class="p">)</span> <span class="n">encryption_percent</span> <span class="o">=</span> <span class="mi">50</span><span class="p">;</span>
<span class="p">}</span> <span class="k">else</span> <span class="p">{</span>
    <span class="n">encryption_percent</span> <span class="o">=</span> <span class="mi">50</span><span class="p">;</span>
<span class="p">}</span>

<span class="k">if</span> <span class="p">(</span><span class="n">encryption_percent</span> <span class="o">&lt;</span> <span class="mi">1</span> <span class="o">||</span> <span class="n">encryption_percent</span> <span class="o">&gt;</span> <span class="mi">100</span><span class="p">)</span> <span class="p">{</span>
    <span class="n">encryption_percent</span> <span class="o">=</span> <span class="mi">50</span><span class="p">;</span>
<span class="p">}</span>
</code></pre></div></div>

<h3 id="34-system-enumeration--thread-allocation">3.4 System Enumeration &amp; Thread Allocation</h3>

<p>Around line ~700, Akira calls <code class="language-plaintext highlighter-rouge">GetSystemInfo</code> from <code class="language-plaintext highlighter-rouge">kernel32.dll</code> to count available CPUs and allocate encryption threads:</p>

<div class="language-c highlighter-rouge"><div class="highlight"><pre class="highlight"><code><span class="c1">// Boost thread count for systems with few CPUs</span>
<span class="k">if</span> <span class="p">(</span><span class="n">cpu_count</span> <span class="o">&lt;</span> <span class="mi">5</span><span class="p">)</span> <span class="p">{</span>
    <span class="k">if</span> <span class="p">(</span><span class="n">cpu_count</span> <span class="o">==</span> <span class="mi">1</span><span class="p">)</span> <span class="n">cpu_count</span> <span class="o">=</span> <span class="mi">2</span><span class="p">;</span>
    <span class="n">cpu_count</span> <span class="o">=</span> <span class="n">cpu_count</span> <span class="o">*</span> <span class="mi">2</span><span class="p">;</span>
<span class="p">}</span>

<span class="c1">// Allocate threads</span>
<span class="n">folder_parser_threads</span> <span class="o">=</span> <span class="p">(</span><span class="n">cpu_count</span> <span class="o">*</span> <span class="mi">30</span><span class="p">)</span> <span class="o">/</span> <span class="mi">100</span><span class="p">;</span>   <span class="c1">// 30% for folder parsing</span>
<span class="n">root_folder_threads</span>   <span class="o">=</span> <span class="p">(</span><span class="n">cpu_count</span> <span class="o">*</span> <span class="mi">10</span><span class="p">)</span> <span class="o">/</span> <span class="mi">100</span><span class="p">;</span>   <span class="c1">// 10% for root parsing</span>
<span class="k">if</span> <span class="p">(</span><span class="n">root_folder_threads</span> <span class="o">==</span> <span class="mi">0</span><span class="p">)</span> <span class="n">root_folder_threads</span> <span class="o">=</span> <span class="mi">1</span><span class="p">;</span>
<span class="n">encryption_threads</span>    <span class="o">=</span> <span class="n">cpu_count</span> <span class="o">-</span> <span class="n">folder_parser_threads</span> <span class="o">-</span> <span class="n">root_folder_threads</span><span class="p">;</span>
</code></pre></div></div>

<h3 id="35-crypto-engine-initialization">3.5 Crypto Engine Initialization</h3>

<p><img src="/assets/process_tree_cryptoengine.png" alt="Crypto engine function graph" /></p>

<div align="center">
<small>This function is huge!</small>
</div>

<p>We’ll tackle the cryptography in Part 2.</p>

<hr />

<h2 id="conclusion">Conclusion</h2>

<p>In this first part, we’ve mapped out the binary’s structure and traced execution from entry point to the main encryption orchestration logic.</p>

<p><strong>Key findings:</strong></p>

<ul>
  <li>Standard PE structure with a <em>custom</em> cryptographic implementation (no imported crypto libraries)</li>
  <li>Sophisticated multi-threaded architecture that dynamically allocates CPU resources</li>
  <li>Command-line argument parsing for operational flexibility</li>
  <li>Logging mechanisms for tracking execution</li>
  <li>Shadow copy deletion via PowerShell to prevent recovery</li>
</ul>

<p>In Part 2, we’ll dive into <code class="language-plaintext highlighter-rouge">FUN_1400b71a0()</code> — the 2,165-line encryption engine — and examine the custom crypto implementation, how the RSA public key in <code class="language-plaintext highlighter-rouge">.rdata</code> is used, the ChaCha20 stream cipher, and the file selection logic.</p>

<p>What’s most interesting about Akira is that it implements its own cryptography without using standard libraries. This helps with obfuscation by preventing EDRs from intercepting API calls — but it also leads to implementation flaws, as we’ll see soon.</p>]]></content><author><name>Damian Villarreal</name></author><category term="security" /><category term="reverse-engineering" /><category term="malware" /><category term="ghidra" /><category term="akira" /><summary type="html"><![CDATA[]]></summary><media:thumbnail xmlns:media="http://search.yahoo.com/mrss/" url="https://damianvillarreal.com/assets/akira.jpg" /><media:content medium="image" url="https://damianvillarreal.com/assets/akira.jpg" xmlns:media="http://search.yahoo.com/mrss/" /></entry></feed>